Showing posts with label Java. Show all posts
Table of Content
Java OptionalInt example
OptionalInt allows us to create an object which may or may not contain a int value. If a value is present, isPresent() will return true and getAsInt() will return the value.
Additional methods that depend on the presence or absence of a contained value are provided, such as orElse().
Other classes similar to OptionalInt are OptionalFloat, OptionalDouble, Optional. These can help us eliminate exceptions that occur due to the absence of a value at runtime. Basically we need to first check if the Optional is carrying any value then only try to get value.
In this example we are returning an OptionalInt from Stream created from integer array and finally returning the sum using reduce method. If the Value is present then only we are trying to pring the value by calling result.getAsint()
package javaexp.blogspot.stream;

import java.util.Arrays;
import java.util.OptionalInt;

public class OptionalIntExample {

  public static void main(String[] args) {
    int iarray[] = {9, 10, 11, 12, 15, 15, 25};

    OptionalInt result = Arrays.stream(iarray).reduce((left, right) ->left );

    if (result.isPresent() ) {
      System.out.println("Sum of Array " + result.getAsInt());
    }

  }

}
Summary
OptionalInt and other respective Optional classes helping in protecting from Nullpointer exception when we try to get value (say integer value) from and Integer object which is null.
IntSummaryStatistics
IntSummaryStatistics provides different statistical data like max, min, average. This class is desinged to work with Java streams but can work with with out streams also.
Example
Following class shows an example of IntSummaryStatistics used with stream. It is used to print interesting information like max, min, average, sum and count.
And then the accept method is used to add a new integer to the previous data passed as the numStream.
public class IntSummaryStatisticsExample {

  public static void main(String[] args) {

    Stream<Integer> numStream = Stream.of(1, 2, 3, 4, 5);
    IntSummaryStatistics summary = numStream.mapToInt(p-> p).summaryStatistics();

    System.out.println("Max From the Data is " + summary.getMax());
    System.out.println("Min From the Data is " + summary.getMin());
    System.out.println("Average From the Data is " + summary.getAverage());
    System.out.println("Sum From the Data is " + summary.getSum());
    System.out.println("Count From the Data is " + summary.getCount());

    //Add a new number to the stream
    System.out.println("\n");
    summary.accept(10);

    System.out.println("Max From the Data is " + summary.getMax());
    System.out.println("Min From the Data is " + summary.getMin());
    System.out.println("Average From the Data is " + summary.getAverage());
    System.out.println("Sum From the Data is " + summary.getSum());
    System.out.println("Count From the Data is " + summary.getCount());

  }
}
IntSummaryStatistics Example
Max From the Data is 5
Min From the Data is 1
Average From the Data is 3.0
Sum From the Data is 15
Count From the Data is 5

Adding number 10 to the data
Max From the Data is 10
Min From the Data is 1
Average From the Data is 4.166666666666667
Sum From the Data is 25
Count From the Data is 6
IntSummaryStatistics Example
Max From the Data is 5
Min From the Data is 1
Average From the Data is 3.0
Sum From the Data is 15
Count From the Data is 5
Adding number 10 to the data
Max From the Data is 10
Min From the Data is 1
Average From the Data is 4.166666666666667
Sum From the Data is 25
Count From the Data is 6
Conclusion
IntSummaryStatistics defined in java.util package and available since java 8 provides a way to calculate statistical information. It works with and with out stream.
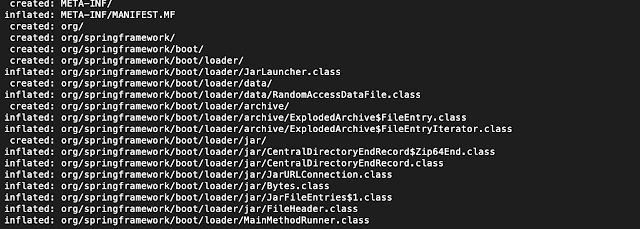
Extract content of .war file
A WAR file (Web Application Resource or Web application Archive) is a file used to distribute a collection of files and folders associated with web application. Sometimes we want to look inside the war file to know what files or folders are inside the war file.
Jar -xvf
jar with option -xvf will extract the content of the war file. Following command will extract the content of blogapp.war file into the current directory
jar -xvf blogapp.war
To extract the content of war file type the above command. For instance for a war file blogapp.war
we can use the command jar -xvf.
Conclusion
jar -xvf can be used to extract the content of jar file. This command will work in any platform with installed java.
HashMap computeIfPresent() method in Java with Examples
The computeIfPresent(Key, BiFunction) method of HashMap class is used to update value in a key-value pair in the map. If key does not exist then it does not do any thing.
Syntax
undefined
V computeIfPresent(K key,
            BiFunction<? super K, ? super V, ? extends V> remappingFunction)
Example
Following is an example of computeIfAbsent invocation and its results.
ComputeIfAbsentExample
package corejava.map;

import java.util.HashMap;
import java.util.Map;

public class ComputeIfPresentExample {

	public static void main (String argv[]) {

		Map<String, Integer> map = new HashMap<String, Integer>();

		map.put("Sunglass", 105);
		map.put("Watch", 1501);


		newline("Original Map");
		map.forEach((a, b) -> {
			System.out.println(a + " -> " + b);
		});


		map.computeIfPresent("Watch", (k,v) -> {return v + v;});

		newline("After calling computeIfAbsent Map");
		map.forEach((a, b) -> {
			System.out.println(a + " -> " + b);
		});
	}

	static void newline(String s) {
		System.out.println("\n" + s);
	};
}
Output of above program.
Original Map
Watch -> 1501
Sunglass -> 105

After calling computeIfAbsent Map
Watch -> 3002
Sunglass -> 105
Summary
computeIfPresent helps in writing more compact code and also make code more readable.
HashMap computeIfAbsent() method in Java with Examples
The computeIfAbsent(Key, Function) method of HashMap class is used to enter a new key-value pair to map if the key does not exist. If key exists then it does not do any thing.
Syntax
undefined
public V computeIfAbsent(K key, Function<? super K, ? extends V> remappingFunction)Example
Following is an example of computeIfAbsent invocation and its results.
ComputeIfAbsentExample
package corejava.map;

import java.util.HashMap;
import java.util.Map;

public class ComputeIfAbsentExample {

	public static void main (String argv[]) {

		Map<Integer, String> map = new HashMap<Integer, String>();

		map.put(1, "one");
		map.put(2, "two");
		map.put(3, "three");
		map.put(4, "four");
		map.put(5, "five");

		newline("Original Map");
		map.forEach((a, b) -> {
			System.out.println(a + " -> " + b);
		});

		map.computeIfAbsent(6, k-> { return "six";});
		map.computeIfAbsent(7, k -> "seven");

		newline("After calling computeIfAbsent Map");
		map.forEach((a, b) -> {
			System.out.println(a + " -> " + b);
		});
	}

	static void newline(String s) {
		System.out.println("\n" + s);
	};
}
Output of above program.
Original Map
1 -> one
2 -> two
3 -> three
4 -> four
5 -> five

After calling computeIfAbsent Map
1 -> one
2 -> two
3 -> three
4 -> four
5 -> five
6 -> six
7 -> seven
Summary
computeIfAbsent helps in writing more compact code and also make code more readable.
Remove all entries in map by value
Java Map is a data structure that holds key->value pairs. In this article we will see how to delete all entries in the map by map values.
Using removeAll
removeAll() takes one argument a collection. And entries matching the passed collection will be removed from the original map
Using removeAll
Map<Integer, String> map = new HashMap<Integer, String>();
map.put(1, "one");
map.put(2, "two");
map.put(3, "three");
map.put(4, "four");
map.put(5, "five");
map.put(6, "five");

newline("Original Map");
map.values().removeAll(Collections.singleton("five"));

newline("After removing values = five");
map.forEach( (a,b) -> {
	System.out.println(a + " -> " + b);
});
Output of above program.
Original Map
1 -> one
2 -> two
3 -> three
4 -> four
5 -> five
6 -> five
7 -> five

After removing values = five
1 -> one
2 -> two
3 -> three
4 -> four
Using removeIf
removeIf
Map<Integer, String> map = new HashMap<Integer, String>();
map.put(1, "one");
map.put(2, "two");
map.put(3, "three");
map.put(4, "four");
map.put(5, "five");
map.put(6, "five");

newline("Original Map");

//remove entries where value = five
map.values().removeIf("five"::equals);

newline("After removing values = five");
map.forEach( (a,b) -> {
	System.out.println(a + " -> " + b);
});
Output of above program.
Original Map
1 -> one
2 -> two
3 -> three
4 -> four
5 -> five
6 -> five
7 -> five

After removing values = five
1 -> one
2 -> two
3 -> three
4 -> four
Remove all entries from java map
Java Map is a data structure that holds key->value pairs. In this article we will see how to delete all entries in the map in java easily and efficetively.
Method clear()
clear() method is method that does not return any thing (void return type) and is part of the Map interface.
Each implementation subclasses provides an implementation. clear () methods deleted all entries and turn them map into empty map.
Clear method
static void clearALLItemsInMap() {
		Map<Integer, String> map = new HashMap<Integer, String>();
		map.put(1, "one");
		map.put(2, "two");
		map.put(3, "three");
		map.put(4, "four");
		map.put(5, "five");
		map.put(6, "five");

		newline("Original Map");
		map.forEach( (a,b) -> {
			System.out.println( a + " -> " + b);
		});

                 //clear the map
		map.clear();

		newline("After classing clear() Map");
		map.forEach( (a,b) -> {
			System.out.println(a + " -> " + b);
		});
	}
Output of above program.
Original Map
1 -> one
2 -> two
3 -> three
4 -> four
5 -> five
6 -> five

After classing clear() Map
empty
Summary
For removing all the entries from java map, clear() method is the best option. Also please note that the clear() method is implemented in each of its implementation classes like, HashMap, TreeMap, LinkedHashMap etc.
When to use Java BigInteger
Java BigInteger class is used to perform arithmetic operation or holding Numbers large enough that Integer cannot hold. In fact BigInteger does not have any limit on the numerical value that it can represent.
java.math.BigInteger
Integer Max and Min value
In Java Integer can hold between 2147483647 and -2147483648. This is denoted by Integer.MAX_VALUE and Integer.MIN_VALUE
Print Value of Integer Max and Min
Print max and min value
System.out.println(Integer.MAX_VALUE); //2147483647
System.out.println(Integer.MIN_VALUE);  //-2147483648
When we have numbers that cannot fit in the Integer range we can use BigInteger class. Also this Class provides a lot of methods to carry out different mathematical operations such as
add,
subtract,
divide,
multiply and many more
BigInteger Example
BigInteger a = BigInteger.valueOf(15);
BigInteger b = BigInteger.ONE;

BigInteger result = a.add(b);
System.out.println("Addition of a,b = " + result);

result = a.subtract(b);
System.out.println("Subtration of a,b = " + result);

result = a.divide(b);
System.out.println("Division of a,b = " + result);

result = a.multiply(b);
System.out.println("Multipllication of a,b = " + result);Generate random number
Following java code will generate a random number between a given range. For instance if we want to generate a random number between 80, 100 we can use the following codes. In java to generate random number we have two options, using class Math or Random. We will see both examples
Using Class java.lang.Math
Math.random() generates a fraction(double) number between 0.0 and 1.0. We then add the lower bound to the product of (upperbound-lowerbound)*random_between0_1.
GenerateRandom1
private static int generateRandomInteger(int rangeStart, int rangeEnd) {
		// generate double between 0.0 and 1.0
		double r = Math.random();
		Integer result = (int) (rangeStart + r * (rangeEnd - rangeStart));
		return result;
	}
Using Class java.util.Random
GenerateRandom2
private static int generateRandomIntegerII(int rangeStart, int rangeEnd) {
		// generate double between 0.0 and 1.0
		Random random = new Random();
		double r = random.nextDouble();
		Integer result = (int) (rangeStart + r * (rangeEnd - rangeStart));
		return result;
}
Full Example
GenerateRandomNumber
import java.util.Random;
public class GenerateRandomNumber {

	public static void main(String[] args) {

		System.out.println(GenerateRandomNumber.generateRandomInteger(35, 40));
		System.out.println(GenerateRandomNumber.generateRandomIntegerII(35, 40));

	}

	private static int generateRandomInteger(int rangeStart, int rangeEnd) {
		// generate double between 0.0 and 1.0
		double r = Math.random();
		Integer result = (int) (rangeStart + r * (rangeEnd - rangeStart));
		return result;
	}

	private static int generateRandomIntegerII(int rangeStart, int rangeEnd) {
		// generate double between 0.0 and 1.0
		Random random = new Random();
		double r = random.nextDouble();
		Integer result = (int) (rangeStart + r * (rangeEnd - rangeStart));
		return result;
	}

}
JDK Module listing
Go to Terminal and execute following command (java --list-modules). It will list all the modules available in the JDK.
Terminal
$java --list-modules

java.base@18.0.1.1
java.compiler@18.0.1.1
java.datatransfer@18.0.1.1
java.desktop@18.0.1.1
java.instrument@18.0.1.1
java.logging@18.0.1.1
java.management@18.0.1.1
java.management.rmi@18.0.1.1
java.naming@18.0.1.1
java.net.http@18.0.1.1
java.prefs@18.0.1.1
java.rmi@18.0.1.1
java.scripting@18.0.1.1
java.se@18.0.1.1
java.security.jgss@18.0.1.1
java.security.sasl@18.0.1.1
java.smartcardio@18.0.1.1
java.sql@18.0.1.1
java.sql.rowset@18.0.1.1
java.transaction.xa@18.0.1.1
java.xml@18.0.1.1
java.xml.crypto@18.0.1.1
jdk.accessibility@18.0.1.1
jdk.attach@18.0.1.1
jdk.charsets@18.0.1.1
jdk.compiler@18.0.1.1
jdk.crypto.cryptoki@18.0.1.1
jdk.crypto.ec@18.0.1.1
jdk.dynalink@18.0.1.1
jdk.editpad@18.0.1.1
jdk.hotspot.agent@18.0.1.1
jdk.httpserver@18.0.1.1
jdk.incubator.foreign@18.0.1.1
jdk.incubator.vector@18.0.1.1
jdk.internal.ed@18.0.1.1
jdk.internal.jvmstat@18.0.1.1
jdk.internal.le@18.0.1.1
jdk.internal.opt@18.0.1.1
jdk.internal.vm.ci@18.0.1.1
jdk.internal.vm.compiler@18.0.1.1
jdk.internal.vm.compiler.management@18.0.1.1
jdk.jartool@18.0.1.1
jdk.javadoc@18.0.1.1
jdk.jcmd@18.0.1.1
jdk.jconsole@18.0.1.1
jdk.jdeps@18.0.1.1
jdk.jdi@18.0.1.1
jdk.jdwp.agent@18.0.1.1
jdk.jfr@18.0.1.1
jdk.jlink@18.0.1.1
jdk.jpackage@18.0.1.1
jdk.jshell@18.0.1.1
jdk.jsobject@18.0.1.1
jdk.jstatd@18.0.1.1
jdk.localedata@18.0.1.1
jdk.management@18.0.1.1
jdk.management.agent@18.0.1.1
jdk.management.jfr@18.0.1.1
jdk.naming.dns@18.0.1.1
jdk.naming.rmi@18.0.1.1
jdk.net@18.0.1.1
jdk.nio.mapmode@18.0.1.1
jdk.random@18.0.1.1
jdk.sctp@18.0.1.1
jdk.security.auth@18.0.1.1
jdk.security.jgss@18.0.1.1
jdk.unsupported@18.0.1.1
jdk.unsupported.desktop@18.0.1.1
jdk.xml.dom@18.0.1.1
jdk.zipfs@18.0.1.1
As we can see in the above command output, we have around 70 modules.
All JDK Modules starts with "jdk.*"
All Java SE Specifications Modules starts with "java.*"
What is package-info.java used for in Java
package-info.java is a special file which is used for generating package level documentations as well as keeping all package level annotations. For each package we can have one package-info file.
Here will see two different examples of package-info.java.
Package Documentation
For instance in a project, I have the following package-info.java for package javaexp.corejava.collection.
package-info.java
/**
 * Tutorials and Samples form Java  Collection framework.
 */

package javaexp.corejava.collection;
If we see the generated Javadocs we will notice the package level comments as well.

Package Level Annotation
We have the following entry, to mark the whole package deprecated.
package-info.java
@java.lang.Deprecated
package javaexp.corejava.oldcollection;
If we see the generated Javadoc we will see the package is marked as deprecated.

Summary
All though package-info.java is not must for java project, but it do add a lot of value specially if the code base is large and we want to generate package level documentations or say apply Annotations to all the classes in the packge.
Java @Deprecated Annotation
@Deprecated is an annotation to mark method class or package as deprecated. We mark something deprecated to let developers know that the deprecated item can be removed in future.
Where @Deprecated can be used
- Method can be marked @Deprecated.
- Class can be marked with @Deprecated.
- Package can be also marked deprecated with @Deprecated.
Effect of marking with @Deprecated
When we mark a method or class say @Deprecated then the IDE will mark the method with special style to alert about the deprecations.
Also the generated Javadocs will covers deprecated items.

Example
OldCalculator with @Deprecated
/**
 * Sample Calculator which can add two numbers
 *
 */

public class OldCalculator {

	/**
	 * Add two number and return the value as Number
	 *
	 * @param a : First number
	 * @param b : Second number
	 * @return result of addition as Number
	 * @see Number
	 */
	public Number add(Number a, Number b) {
		return a.doubleValue() + b.doubleValue();
	}

	@Deprecated(forRemoval = false, since = "1.1")
	public Number add(CalParameter a, CalParameter b) {
		return a.val.doubleValue() + b.val.doubleValue();
	}

}

@Deprecated
class CalParameter {
	Integer val;
}
In the above example class CalParameter is marked as @Deprecated. Where as method add is marked @Deprecated.
Documentation of @Deprecated
Following image shows Javadocs generated for a project, where some method, class and package are marked @Deprecated

When to use @Deprecated
When we have a better implementation of a method and want to let other developers use the new method rather then old method, we can mark old method @Deprecated.
While refactoring code and marking @Deprecated to yet to be refactored code makes refactoring effective and easier.
Create Java project using maven
Here we will create a project using maven template and import the project in eclipse.
Technology used
- Java 18.0.1.1 2022-04-22
- Apache Maven 4.0.0-alpha-3
- OS: MacOS Monterey (M1)
- Eclipse IDE
Create project
Using maven we will generate the project using archetype = maven-archetype-quickstart. archetype is predefined templates. And then we will generate the eclipse related config files so that the generate project can be imported in eclipse.
Console : Command
mvn archetype:generate -DgroupId=com.project -DartifactId=java-module-project -DarchetypeArtifactId=maven-archetype-quickstart -DinteractiveMode=false
Console : Output
$ mvn archetype:generate -DgroupId=com.project -DartifactId=java-module-project -DarchetypeArtifactId=maven-archetype-quickstart -DinteractiveMode=false
[INFO] Scanning for projects...
[INFO]
[INFO] -----------------------------------------< org.apache.maven:standalone-pom >-----------------------------------------
[INFO] Building Maven Stub Project (No POM) 1
[INFO] -------------------------------------------------------[ pom ]-------------------------------------------------------
[INFO]
[INFO] --- archetype:3.2.1:generate (default-cli) @ standalone-pom ---
[INFO] Generating project in Batch mode
[INFO] ----------------------------------------------------------------------------
[INFO] Using following parameters for creating project from Old (1.x) Archetype: maven-archetype-quickstart:1.0
[INFO] ----------------------------------------------------------------------------
[INFO] Parameter: basedir, Value: /Users/sbhome
[INFO] Parameter: package, Value: com.project
[INFO] Parameter: groupId, Value: com.project
[INFO] Parameter: artifactId, Value: java-module-project
[INFO] Parameter: packageName, Value: com.project
[INFO] Parameter: version, Value: 1.0-SNAPSHOT
[INFO] project created from Old (1.x) Archetype in dir: /Users/sbhome/java-module-project
[INFO] ---------------------------------------------------------------------------------------------------------------------
[INFO] BUILD SUCCESS
[INFO] ---------------------------------------------------------------------------------------------------------------------
[INFO] Total time:  6.667 s
[INFO] Finished at: 2023-02-07T22:46:00-08:00
[INFO] ---------------------------------------------------------------------------------------------------------------------
Terminal:: $
After the maven command execution is complete it will create the project folder java-module-project. Next move inside the folder (cd java-module-project)
Console : Command
cd java-module-project
Create Eclipse Project
Console : Command
mvn eclipse:eclipse
Console : Output
[INFO] Scanning for projects...
[INFO]
[INFO] -----------------------------------------< com.project:java-module-project >-----------------------------------------
[INFO] Building java-module-project 1.0-SNAPSHOT
[INFO]   from pom.xml
[INFO] -------------------------------------------------------[ jar ]-------------------------------------------------------
[INFO]
[INFO] --- eclipse:2.10:eclipse (default-cli) @ java-module-project ---
[WARNING] The POM for org.apache.maven.wagon:wagon-http-lightweight:jar:1.0-beta-6 is invalid, transitive dependencies (if any) will not be available, enable verbose output (-X) for more details
[WARNING] The POM for org.apache.maven.wagon:wagon-http:jar:1.0-beta-6 is invalid, transitive dependencies (if any) will not be available, enable verbose output (-X) for more details
[WARNING] The POM for org.apache.maven.wagon:wagon-webdav-jackrabbit:jar:1.0-beta-6 is invalid, transitive dependencies (if any) will not be available, enable verbose output (-X) for more details
[WARNING] The POM for org.apache.maven.wagon:wagon-http-lightweight:jar:1.0-beta-2 is invalid, transitive dependencies (if any) will not be available, enable verbose output (-X) for more details
[INFO] Using Eclipse Workspace: null
[INFO] Adding default classpath container: org.eclipse.jdt.launching.JRE_CONTAINER
[INFO] Not writing settings - defaults suffice
[INFO] Wrote Eclipse project for "java-module-project" to /Users/sbhome/java-module-project.
[INFO]
[INFO] ---------------------------------------------------------------------------------------------------------------------
[INFO] BUILD SUCCESS
[INFO] ---------------------------------------------------------------------------------------------------------------------
[INFO] Total time:  0.494 s
[INFO] Finished at: 2023-02-07T22:51:03-08:00
[INFO] ---------------------------------------------------------------------------------------------------------------------
Import Project in Eclipse
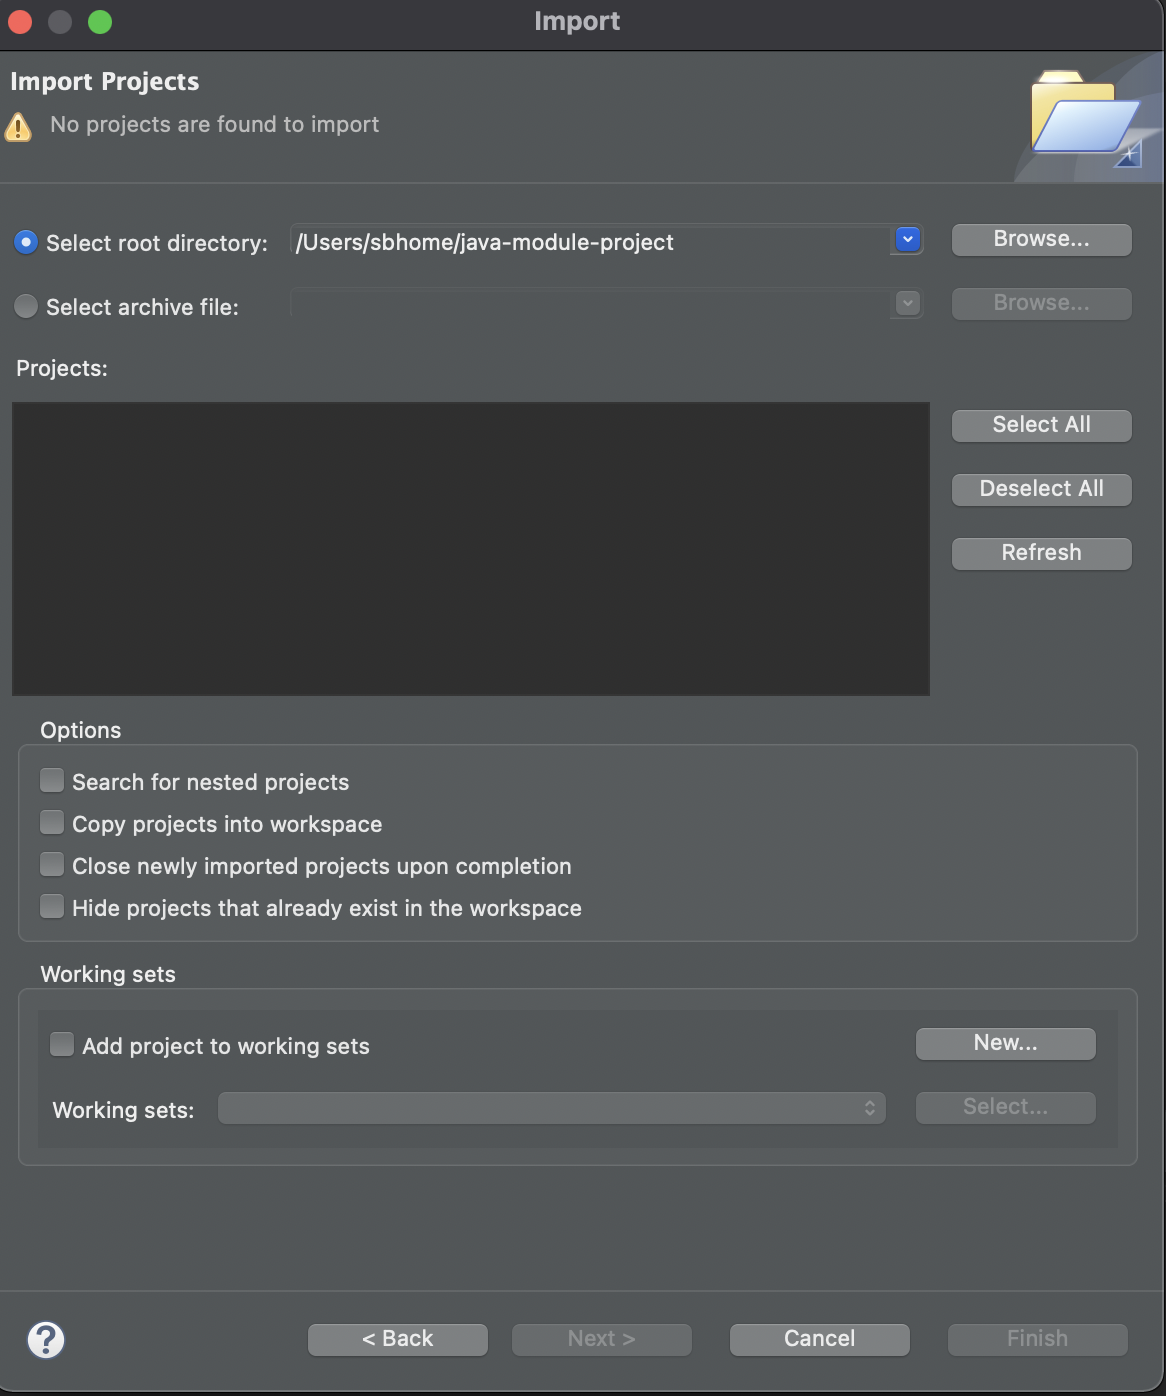

Project in Eclipse

POM file
pom.xml
<project xmlns="http://maven.apache.org/POM/4.0.0" xmlns:xsi="http://www.w3.org/2001/XMLSchema-instance"
  xsi:schemaLocation="http://maven.apache.org/POM/4.0.0 http://maven.apache.org/maven-v4_0_0.xsd">
  <modelVersion>4.0.0</modelVersion>
  <groupId>com.project</groupId>
  <artifactId>java-module-project</artifactId>
  <packaging>jar</packaging>
  <version>1.0-SNAPSHOT</version>
  <name>java-module-project</name>
  <url>http://maven.apache.org</url>
  <dependencies>
    <dependency>
      <groupId>junit</groupId>
      <artifactId>junit</artifactId>
      <version>3.8.1</version>
      <scope>test</scope>
    </dependency>
  </dependencies>
</project>
Build Project
Console : Command
mvn install
Console : Output
[INFO]  T E S T S
[INFO] -------------------------------------------------------
[INFO] Running com.project.AppTest
[INFO] Tests run: 1, Failures: 0, Errors: 0, Skipped: 0, Time elapsed: 0.006 s - in com.project.AppTest
[INFO]
[INFO] Results:
[INFO]
[INFO] Tests run: 1, Failures: 0, Errors: 0, Skipped: 0
[INFO]
[INFO]
[INFO] --- jar:3.2.0:jar (default-jar) @ java-module-project ---
[INFO] Building jar: java-module-project-1.0-SNAPSHOT.jar
[INFO]
[INFO] --- install:3.0.0-M1:install (default-install) @ java-module-project ---
[INFO]
[INFO] ---------------------------------------------------------------------------------------------------------------------
[INFO] BUILD SUCCESS
Java logical operator short circuiting
In java we logical operator when we can use short circuit (&& ||)to not evaluate right hand side condition. Short circuiting is using double AND or double OR.
Logical OR and AND :- returns final verdict only after evaluating both expressions. Does not matter if first expression is true or false it will always evaluate the second expression.
Short Circuit OR and AND:- if left hand side operand returns true,
In case of OR => it will not evaluate second expression if first expression is true.
In case of AND => it will not evaluate second expression if first expression is false.
Sample method to test logical and shortcircuit
private static boolean appleIsFruit() {
	System.out.println("calling apple ");
	return true;
}

private static boolean bananaIsFruit() {
	System.out.println("calling banana ");
	return true;
}

private static boolean cloudIsfruit() {
	System.out.println("calling cloud ");
	return false;
}
Logical Operator
System.out.println("\n\napple | banana");
if (appleIsFruit() | bananaIsFruit()) {
	System.out.println("inside apple | banana");
}

System.out.println("\n\ncloud & apple");
if (cloudIsfruit() & appleIsFruit()) {
	System.out.println("inside cloud & apple");
}
Terminal
Console
apple | banana
calling apple
calling banana
inside apple | banana

cloud & apple
calling cloud
calling apple
Above we can see even though the first method returned false (cloud & apple) the second method was still invoked.
Short circuit logical operation
System.out.println("apple || banana");
if (appleIsFruit() || bananaIsFruit()) {
	System.out.println("inside apple || banana");
}

System.out.println("\n\ncloud && apple");
if (cloudIsfruit() && appleIsFruit()) {
	System.out.println("inside cloud && apple");
}
Terminal
Short circuit
apple || banana
calling apple
inside apple || banana

cloud && apple
calling cloud
In the short circuit case the second expression is not evaluated.
Summary
Short circuiting logical operation can improve performance and efficiency of code. But we have to keep in mind the way short circuiting works.
How to iterate Java Map
Java Map can be iterated various ways to go over all the key:value pairs
Create Map and add some values
Map<Integer, String> map = new HashMap<>();
map.put(1,"Argentina");
map.put(2,"France");
map.put(3,"Brazil");
map.put(4,"Germany");
Using EntrySet Iterator
//EntrySet Iterator
System.out.println("\nEntrySet foreach");
Iterator<Entry<Integer, String>> it = map.entrySet().iterator();
while(it.hasNext()) {
    Map.Entry<Integer, String> keyVal = it.next();
    System.out.println(keyVal.getKey() + " " + keyVal.getValue());
}
Using EntrySet and foreach
//EntrySet and foreach
System.out.println("\nEntrySet foreach");
Set<Entry<Integer, String>> entrySet = map.entrySet();
entrySet.forEach((e-> { System.out.println(e.getKey() + " " + e.getValue());}));
Using Keyset Iterator
//Keyset Iterator
System.out.println("\nKeyset Iterator");
Iterator<Integer> kit = map.keySet().iterator();
while(kit.hasNext()) {
    Integer key = kit.next();
	System.out.println(key + " " + map.get(key));
}
Keyset For loop
//Keyset For loop
System.out.println("\nKeyset For loop");
for (Integer key : map.keySet()) {
	System.out.println(key + " " + map.get(key));
}
Using Java 8 Lambda
//map foreach (Java 8 Lambda)
System.out.println("\nUsing Map.foreach (Java 8 Lambda");
map.forEach((key,value)-> {System.out.println(key + " " + value);});
Summary
Here I have covered 5 different ways to iterate over Java Map and access both key and values.
When to use LinkedHashMap.removeEldestEntry method
removeEldestEntry method exists only on subclasses of LinkedHashMap
removeEldestEntry always invoked after an element is inserted.
Based on what this method returns following action will happen
if method returns true based on some condition, then the oldest entry will be removed.
if method always returns true then basically list will be empty.
if method return false, then nothing will be deleted and map will behave like any other LinkedHashMap.
after every put or putAll insertion, the eldest element will be removed, no matter what. The JavaDoc shows a very sensible example on how to use it:
Lets see an example of removeEldestEntry.
MapRemoveEntry Example
import java.util.LinkedHashMap;
import java.util.Map;

public class MapRemoveEntry {

	public static void main(String argv[]) {

		LinkedHashMap<Integer, String> map = new LinkedHashMap<Integer, String>() {
			private static final long serialVersionUID = 1L;

			protected boolean removeEldestEntry(Map.Entry<Integer,String> eldest) {
				return size() > 4;
			}
		};;


		map.put(0, "A");
		map.put(1, "B");
		map.put(2, "C");
		map.put(3, "D");
		map.put(4, "E");


		map.forEach((k,v) -> { System.out.println("key = " + k + " value = " + v);});
	}
}
If we run the above example we will get following output.
Terminal
Console
key = 1 value = B
key = 2 value = C
key = 3 value = D
key = 4 value = E
Reason is, method removeEldestEntry returns true when the map size is >4. That means when the map size is greater than 4 => the oldest entry will be removed. In this case oldest is the very first entry with (key=0, value=A).
Summary
Using removeEldestEntry we can control when to remove the most oldest entry from the map. This can be used for creating a cache.
About sealed classes and interfaces
Starting Java 17 we can now allow additional class modifiers like sealed, non-sealed etc.
A sealed class or interface can be extended or implemented only by those classes and interfaces permitted to do so.
Earlier we had only two options, allow subclasses to inherit the parent class or interface or not at all. In the later case using Final class modifier. Using sealed we can take a more controlled middle path where the Parent Class or Interface can dictate the Sub classes which can inherit from the Class.
Following are the keywords related to sealed classes.
sealed : only permitted classes can extend a sealed class/interface
permits: used along with sealed and mentions the names of the child classes.
non-sealed: if we want a specific class (inherited from a sealed class) to be inheritable we can open it up by marking it non-sealed.
Defining sealed class
Let's define a sealed class Tesla with 3 known subclasses that it can have.
sealed Tesla
Tesla
package java17.sealed;

public abstract sealed class Tesla permits Model3, ModelS, TeslaSUV{
	public abstract Integer maxRange();
	public String basePrice() {
		return "25000 USD";
	}
}
Now start implementing the subclasses possible. We implement Model3 and mark it final which will make the inheritance chance closed at this level.
Model3
//Subclass 1
public final class Model3 extends Tesla {
	@Override
	public Integer maxRange() {
		return 200;
	}
}
ModelS
//Subclass 2
public final class ModelS extends Tesla {
	@Override
	public Integer maxRange() {
		return 400;
	}
}
In this third case we want the TeslaSUV to be extendable so that it can be extended. That's why we will mark it with non-sealed.
TeslaSUV
//Subclass3 (non-sealed)
public non-sealed class TeslaSUV extends Tesla {
	@Override
	public Integer maxRange() {
		// TODO Auto-generated method stub
		return null;
	}
}
Style Two: Using member classes
We can also directly implement possible child classes that we want to allow as member classes without using permit. In the following example we are creating a sealed class BMWCars and three member classes.
BMWCars
package java17.sealed;

public sealed class BMWCars {

	public final class BMW3 extends BMWCars implements ElectricVehicle{

	}

	public final class BMWI extends BMWCars implements Vehicle {

	}

	public non-sealed class BMWJV extends BMWCars implements Vehicle {

	}

}
Rules for Defining Sealed Classes or Interfaces
Both Class and Interface can be marked with sealed.
Inherited child classes can be marked with either final, sealed and non-sealed.
Every permitted subclass must directly extend the sealed class.
A permitted subclass may be non-sealed so that it is open for extension by unknown subclasses.
Summary
With introduction of sealed classes we can define the known subclasses of an abstract class. In other words now we can enforce extension of classes that is known in compile time. It allows us to have greater control of class proliferation and improve security.
Java record in details with example
With Java 14 we have a new way to represent data intensive objects with less boilerplate codes.
Consider the following object representing Address and containing 5 fields.
Address:{
street:
city:
zip:
state:
country:
}
following record AddressRecord will be able to represent above address information.
AddressRecord
package Java14;

public record AddressRecord(String street, String city, Integer zip, String state, String country) {

}
We can instantiate AddressRecord record instance by passing the parameter values. Also system will generate the getter methods.
The JVM will generate the getter methods for us. like,
street()
city()
zip()
state()
country()
AddressRecordDemo
package Java14;

public class AddressRecordDemo {

	public static void main (String arg[]) {

		AddressRecord address1 = new AddressRecord("1044 Main Street", "Livermore", 94550, "CA", "USA");

		System.out.println(address1.street());
		System.out.println(address1.city());
		System.out.println(address1.state());
	}
}
Record can be very useful when we want to write DTO objects which is to carry or represent information. Following are some of the properties/rules that record have.
Rules for record
- record can have Constructor.
- record can have only static fields.
- record cannot have instance field.
- record can implement Interfaces.
- We cannot extends record since implicitly it is final.
How to check if a Java object is final
final modifier can be applied at class level. If a Class is marked final it cannot be extended.
Sample final Class
final class MyCustomClass {

}
Using java.lang.reflect.Modifier
Using java.lang.reflect.Modifier,, We can check if a class is final though java.lang.reflect.Modifier.isFinal() method.
MyCustomClass.class.getModifiers() will provide an integer number representing the class modifier. For example for the above class it prints 16.
Now the value returned from the getModifiers() can be decoded with method Modifier.isFinal();
JavaReflectionModifiers
import java.lang.reflect.Modifier;

public class JavaReflectionModifiers {

	public static void main(String[] args) {

                 //prints 16
		System.out.println(MyCustomClass.class.getModifiers());

                 //returns true
		Modifier.isFinal(MyCustomClass.class.getModifiers());

	}

}


final class MyCustomClass {

}
More Examples
Examples
package Java14;

import java.lang.reflect.Modifier;

public class JavaReflectionModifiers {

	public static void main(String[] args) {

		System.out.println(MyCustomClass.class.getModifiers());

		//prints true
		System.out.println(Modifier.isFinal(MyCustomClass.class.getModifiers()));

		//prints true
		System.out.println(Modifier.isFinal(String.class.getModifiers()));

		//prints false
		System.out.println(Modifier.isFinal(Number.class.getModifiers()));

	}

}


final class MyCustomClass {

}Can Java record be extended?
Java record introduced in java 14. It provides a way to reduce boiler plate code while defining data classes. record is final implicitly and cannot be extended.
For example in the following record MobilePhone, we cannot extend it.
record MobilePhone
record MobilePhone(String brand, String modelName, Number osVersion, boolean canFlip) {

}
Java records are implicitly final it can be confirmed by the following code. Which checks if the java.lang.Class for the object have final modifier or not.
RecordFinalTest
package Java14;

import java.lang.reflect.Modifier;

public class RecordFinalTest {

	public static void main(String[] args) {

		MobilePhone phone1 = new MobilePhone("Samsung", "Galaxy1", 1, false);

		//false
		System.out.println(Modifier.isFinal(phone1.getClass().getModifiers()));

		//false
		System.out.println(Modifier.isFinal(MobilePhone.class.getModifiers()));

	}

}
For more details about record in Java please check the following references.


