ControllerAdvice

ControllerAdvice is an annotation provided by Spring. It is used to manage Exception handling in a Spring application. It allows us to handle any exception from any Classes in the Application and not just a single Class or one method. This article explains the advantages of using ControllerAdvice and some important points to be considered while using it.
In this article, we will walk through a few examples to demonstrate the functionality of ControllerAdvice annotation. To start will we will use the Spring Boot Rest application. This application has many endpoints specifically to drive a blog backed which can serve APIs for CRUD operations on Blog, Tags, Categories, etc.
Let's examine the following endpoints from the application which allows us to retrieve a specific Blog or Comments by its id.
Example REST API
GET /blogapi/blogs/:Blog_ID
GET /blogapi/comments/:Comments_ID
GET /blogapi/categories/:CAT_ID
All these endpoints return the respective Objects if they exist with the specified ID or throws NotFoundException. If we think about any other Resource that has a GET endpoint will have a similar use case, that is throwing NotFoundException if Object is not found with the specified id.
So basically for any Resource Controller will need to deal with common exceptions that can occur while invoking the API. ControllerAdvice helps in handling all these exceptions from all the controllers globally in a separate class.
We will see the implementation of a Blog controller without Controlleradvice and with Controlleradvice
Let's see the Controller for the GET /blogs/id endpoint without Controlleradvice.

Example 1

Controller for Blog
This controller method implements the GET blog by id. The controller uses BlogService to get the BlogStory object with the specified id. If the service can't find any blog with the specified id, it throws NotFoundException. In the controller, we catch that exception and return ResponseEntity with HTTP Status Not Found. The service can also throw AppExceptions which is also needed to be handled at the controller.
@RequestMapping(value = {"/v1/blogs/{id}"}, method = RequestMethod.GET,
      produces = MediaType.APPLICATION_JSON_VALUE)
  public ResponseEntity getBlogStory(@PathVariable(value = "") String id) {
    ResponseEntity apiResponse;
      BlogStory blogStory;
      try {
        blogStory = blogService.getBlogStory(id);
        apiResponse = new ResponseEntity(blogStory, HttpStatus.OK);
      } catch (NotFoundException e) {
        //Handle NotFoundException
        apiResponse = new ResponseEntity(HttpStatus.NOT_FOUND);
        e.printStackTrace();
      }
      catch (AppException e) {
        //Handle AppException
        apiResponse = new ResponseEntity(HttpStatus.INTERNAL_SERVER_ERROR);
        log.error(e.getMessage());
      }
    return apiResponse;
  }
Nothing is wrong with this controller but, we are doing the same kind of stuff probably in all the controller methods, that are handling NotFoundException or AppException. For instance think about the implementations of other endpoints GET /categories/id and GET /comments/id.
That's where ControllerAdvice comes into the picture. We will create a Global Exception handing class that can handle the specific type of Exceptions for example in our case it is NotFoundException. We mark the class with @ControllerAdvice so that Spring can apply the exception handling implemented in this class globally to all the controllers in this application.

Example 2

GlobalExceptionHandler
package com.bootng.handler.exception;

import java.util.Collections;
import java.util.List;
import org.slf4j.Logger;
import org.slf4j.LoggerFactory;
import org.springframework.http.HttpStatus;
import org.springframework.http.ResponseEntity;
import org.springframework.web.HttpMediaTypeNotSupportedException;
import org.springframework.web.HttpRequestMethodNotSupportedException;
import org.springframework.web.bind.annotation.ControllerAdvice;
import org.springframework.web.bind.annotation.ExceptionHandler;
import org.springframework.web.context.request.WebRequest;
import com.bootng.beans.AppException;

@ControllerAdvice
public class GlobalExceptionHandler {

  private static final Logger log = LoggerFactory.getLogger(GlobalExceptionHandler.class);
/** Customize the response for NotFoundException. */
  @ExceptionHandler({NotFoundException.class})
  protected ResponseEntity<Object> handleNotFoundException(Exception ex, WebRequest request) {
    log.info("global exception handler " + ex.getMessage());
    List<String> errors = Collections.singletonList(ex.getMessage());
    ResponseEntity<Object> ret = ResponseEntity.status(HttpStatus.NOT_FOUND).body(errors);
    return ret;
  }
  
  /** Customize the response for AppException. */
  @ExceptionHandler({AppException.class})
  protected ResponseEntity<Object> handleException(Exception ex, WebRequest request) {
    log.info("global exception handler " + ex.getMessage());
    String errors = "We cannot serve the request now, please try later";
    ResponseEntity<Object> ret = ResponseEntity.status(HttpStatus.FORBIDDEN).body(errors);
    return ret;
  }
}
In this ControllerAdvice implementations, we are handing two exceptions, NotFoundException and AppException. If you see the source code in git, this ControllerAdvice has actually more methods to handle more Exceptions, but here we are just showing handling just these two Exceptions.
Now let us write the same controller taking advantage of the Global Exception Handler class we defined above. Now we don't have to catch the exception in our controller, we can simply work with the core business logic and delegate the exception handling to the Global Exception Handler Class.
Get Blog By ID v2
@RequestMapping(value = {"/v2/blogs/{id}"}, method = RequestMethod.GET,
      produces = MediaType.APPLICATION_JSON_VALUE)
  public ResponseEntity<BlogStory> getBlogStoryV2(@PathVariable(value = "") String id)
      throws AppException, NotFoundException {
    BlogStory blogStory = blogService.getBlogStory(id);
    return new ResponseEntity<BlogStory>(blogStory, HttpStatus.OK);
  }
For the end-user both the controller works exactly the same. But the implementation is different with regards to handling exceptions. If we have a ControllerAdvice and any of the controllers throws exception handled by ControllerAdvice then, Spring will invoke the respective method from the ControllerAdvice to handle the exception


Summary
  • The @ControllerAdvice annotation was first introduced in Spring 3.2
  • We can have a single or multiple controller advice class per application. Having a single controller advice class is recommended per application.
  • ControllerAdvice should contain methods to handle specific errors in the application.
  • Using ControllerAdvice results in more clean and maintainable codes.
  • We can handle both custom Exceptions as well as Spring Exceptions like HttpMediaTypeNotSupportedException, HttpRequestMethodNotSupportedException etc.
Git Source Code
  • git clone https://github.com/siddharthagit/spring-boot-references
  • cd spring-rest
  • mvn clean install
  • mvn spring-boot:run

    Using ObjectMapper with Spring Boot Controller

    If we are writing Spring Controller and want to get access to the request payload and convert it to the domain model. Then we have different ways of handling the request payload. For instance, we can use @RequestBody to convert the incoming payload to a domain object, or to a String, etc. In this article, we will see how we can use ObjectMapper to process incoming payload in s Spring Controller.
    In this article, we will show a controller that accepts a JSON payload and then uses ObjectMapper to create instance of a domain object and then pass it to the service layer to persist it.

    Example

    BlogController with addBlogStory method.
    Here we are reading the JSON input and converting it to a BlogStory Object. We are using ObjectMapper to convert the input JSON to a JsonNode object first. And then we are reading individual attributes from the JsonNode object and setting the corresponding field in our domain object.
    
    @RestController
    @RequestMapping("/blogapi")
    public class BlogAPIController {
      private static final Logger log = LoggerFactory.getLogger(BlogAPIController.class);
      @Autowired
      BlogService blogService;
    
      @RequestMapping(value = {"/blogs"}, method = RequestMethod.POST,
          produces = MediaType.APPLICATION_JSON_VALUE)
      public Object addBlogStory(@RequestBody String input) {
        log.info("inside blog POST method" + input);
        ObjectMapper mapper = new ObjectMapper();
        BlogStory newStory = new BlogStory();
        try {
          JsonNode jsonNode = mapper.readTree(input);
          if (jsonNode.get("id") != null) {
            newStory.setId(jsonNode.get("id").asText());
          }
          if (jsonNode.get("name") != null) {
            newStory.setName(jsonNode.get("name").asText());
          }
          if (jsonNode.get("category") != null) {
            newStory.setCategory(jsonNode.get("category").asText());
          }
          else {
            newStory.setCategory("Finance");
          }
          if (jsonNode.get("summary") != null) {
            newStory.setSummary(jsonNode.get("summary").asText());
          }
          if (jsonNode.get("description") != null) {
            newStory.setDescription(jsonNode.get("description").asText());
          }
    
          blogService.addStory(newStory);
        } catch (Exception e) {
          log.error(e.getMessage());
        }
    
        ResponseEntity apiResponse = new ResponseEntity(newStory, HttpStatus.OK);
        return apiResponse;
      }
    
    }
    
    Notice that we have access to the JsonNode object, which we got from the mapper after reading the JSON payload. Now we can set custom logic. For instance if the category is null in the request payload we are setting default category "Finance"
    Below is a sample JSON payload which will be acceptable by the above controller.
    JSON Payload
    {
        "id": "Java_15",
        "name": "Java 15",
        "summary": "Java 15 Blog Summary",
        "description": "Java 15 BlogLorem ipsum dolor sit amet, consectetur adipiscing elit",
        "category": "Technical"
    }
    Invoking the API
    curl -X POST \
      http://localhost:8080/blogapi/blogs \
      -H 'Content-Type: application/json' \
      -d '{
        "id": "Java_15",
        "name": "Java 15",
        "summary": "Java 15 Blog Summary",
        "description": "Java 15 BlogLorem ipsum dolor sit amet, consectetur adipiscing elit",
        "category": "Technical"
    }'
    Please find the repository link and build instruction as follows.
    Git Source Code
    • git clone https://github.com/siddharthagit/spring-boot-references
    • cd spring-rest
    • mvn clean install
    • mvn spring-boot:run

      Summary

      Using ObjectMapper to serialize JSON and then convert to a domain object gives more control. We then have access to the full JSON object and as we like we can populate the domain object after applying some transformation logic etc.

      References

      RequestBody and ResponseBody

      Spring RequestBody and ResponseBody annotations are used in Spring controllers, where we want to bind web requests to method parameters (RequestBody) or method return value (ResponseBody) to Web response. In this article, we will cover some quick examples of using both these annotations. Although Spring supports different styles of writing controller and accessing request, response object, using RequestBody and ResponseBody helps writing code quickly as all the parameters are already available in the controller, and Spring takes care of serialization and deserialization. Although using ResponseBody is not required if we use @RestController annotation. More about @Restcontroller can be found here @RestController

      Serialization

      Data sent over HTTP to server resources (Like a REST Controller) needs to be converted from serialized version to Objects. We can have different types of REST controllers based on the payload they support. For instance, we can design the REST controller to accept/send XML, JSON, TEXT, or HTML payloads/response. The Controller then should be able to read those data acts on it and return the response. Spring uses HTTP Message converters to convert the HTTP request body into domain object [deserialize request body to domain object], and to convert Domain object back to HTTP response body while returning the response. Spring provides a number of MessageConvertes like bellow, StringHttpMessageConverter: Read Write String
      FormHttpMessageConverter: Read Write HTTP Form Data
      MappingJackson2HttpMessageConverter: Read Write JSON
      MappingJackson2XmlHttpMessageConverter: Read Write XML etc.
      @RequestBody and @ResponseBody body annotation behind the scene uses these Message converter to serialize or deserialize the data. Following section, we will see each example of these two annotations.

      @RequestBody annotations

      Typically in each controller, we can have multiple methods. Each method is tied to a specific HTTP request path via @RequestMapping. That's how Spring knows for an incoming request which method needs to be invoked. If a method parameter is annotated with @RequestBody, Spring will bind the incoming HTTP request body (payload) to the parameter of the respective method tied to the request path. While doing that, Spring will [behind the scenes] use HTTP Message converters to convert the HTTP request body into domain object [deserialize request body to domain object], based on Accept header present in the request.

      @ResponseBody Annotation

      Similar to the @RequestBody annotation the @ResponseBody annotation is used to convert the return type of the method to the HTTP response. Here also Spring will use Message Converter to convert the return type of the method to the HTTP response body, set the HTTP headers, and HTTP status.
      Let's see an example, where we bind a JSON payload to a @RequestBody method parameter. Following the example, we will create a REST endpoint that can take a JSON payload to create a blog category object and then return the response back to the client.
      Our BlogCategory Model
      The model object representing a blog category.
      public class BlogCategory {
        private String id;
        private String name;
        //Getters and Setters removed for readability
      }
      Sample JSON Payload
      This JSON payload can be used to populate the BlogCategory object.
      {
          "id": "new_cat",
          "name": "new cat neme"
      }
      A controller method to add a new category.
      In the following example, we mark the method parameters "input" with @RequestBody. We also mark the return type of the method ResponseEntity with @ResponseBody.
      @RequestMapping(value = {"/categories"}, method = RequestMethod.POST,
            produces = MediaType.APPLICATION_JSON_VALUE)
        public @ResponseBody ResponseEntity addCats(@RequestBody BlogCategory input) {
          try {
            log.info("payload: " + input);
            blogService.addBlogCategories(input);
            return ResponseEntity.ok().body(input);
          } catch (Exception e) {
            log.info(e.getMessage());
            return ResponseEntity.status(HttpStatus.INTERNAL_SERVER_ERROR).build();
          }
        }
      As a result, when the controller receives a request, the payload will be parsed and used to populate an instance of the BlogCategory object. Similarly when returning Web response back to client Spring will serialize the instance of and ResponseEntity to Web response.
      Invoke API with Curl
      We can invoke the API with payload by running the following curl command from a Terminal.
      curl -X POST \
        http://localhost:8080/blogapi/categories \
        -H 'Content-Type: application/json' \
        -d '{
          "id": "new_cat",
          "name": "new cat neme"
      }'
      API Response
      The API should return with the following JSON payload.
      {
          "id": "new_cat",
          "name": "new cat neme"
      }
      Summary
      • @RequestBody annotation facilitates deserialize the payload to a domain object.
      • @ResponseBody annotation facilitates serialization of the domain object to the payload.
      • @ResponseBody annotation is not required if we use @RestController rather then @Controller to annotate our Controller class.
      • @RestController is recommended over using @ResponseBody.
      • Another option is to use ResponseEntity as a return type of the controller method.
      Git Source code
      • git clone https://github.com/siddharthagit/spring-boot-references
      • cd spring-rest
      • mvn clean install
      • mvn spring-boot:run

        References

        ResponseEntity

        ResponseEntity class is used to represent HTTP response containing body, header and status. ResponseEntity class extends HttpEntity and used to encapsulate HTTP response. While writing the REST controller one of the common design questions is what should the controller method return? Also, we need to be cognizant about different REST endpoints and making sure all the responses maintain a standard pattern. All responses share common response building blocks like HTTP headers and HTTP Status. Using ResponseEntity is one of the options to write a REST controller, which helps in setting headers and status easily. ResponseEntity is not the only option we have while creating REST controllers. But It does provide some advantages In this short article, we will see the different ways of writing REST Controller and returning data from the controller.
        How to handing serialize the data from the controller depends on the use case we are dealing with. But we should keep in mind about easy maintenance of code and maintaining request-response structure across different endpoints.
        Using ResponseEntity is not only option to manipulate the response, but We can also return directly any Java object from the controller and let Spring do the serialization (Our Second example in this article).
        For setting the HTTP status only we can use @ResponseStatus annotation.
        For setting headers and status we can also javax.servlet.http.HttpServletResponse directly.

        ResponseEntity Class

        ResponseEntity Class is used to represent whole HTTP responses. It supports the
        the message body,
        headers,
        status, etc.
        Internally Response extends org.springframework.http.HttpEntity The advantage of using ResponseEntity is that it is easy to set headers status on this object directly which gets serialized as an HTTP response.
        Let's see an example controller using ResponseEntity

        Examples

        Example 1: Controller with ResponseEntity
        In this example, we are building a controller that returns a list of Tags as a response. Each tag is represented by a String object, so we are returning basically List
        We are wrapping a list of tags received form service in ResponseEntity> object. We can then set the HTTP status on the ResponseEntity object. If everything looks good, we are setting the status "OK 200", else we are setting HTTP status " 500 Internal Server Error".
        import java.util.List;
        import org.slf4j.Logger;
        import org.slf4j.LoggerFactory;
        import org.springframework.beans.factory.annotation.Autowired;
        import org.springframework.http.HttpHeaders;
        import org.springframework.http.HttpStatus;
        import org.springframework.http.MediaType;
        import org.springframework.http.ResponseEntity;
        import org.springframework.web.bind.annotation.RequestMapping;
        import org.springframework.web.bind.annotation.RequestMethod;
        import org.springframework.web.bind.annotation.RestController;
        import com.bootng.beans.AppException;
        
        @RestController
        @RequestMapping("/blogapi")
        public class TagAPIController {
        
        @RequestMapping(value = {"v1/tags"}, method = RequestMethod.GET,
              produces = MediaType.APPLICATION_JSON_VALUE)
          public ResponseEntity> getTagsV1() {
            try {
              List tags = blogService.getBlogTags();
              return ResponseEntity.ok().body(tags);
            } catch (AppException e) {
              log.error(e.getMessage());
              return ResponseEntity.status(HttpStatus.INTERNAL_SERVER_ERROR).build();
            }
          }
        }
        Following is a controller that also does the same stuff as the above controller. That is the return list of Tags. But here we are not using ResponseEntity, rather we are sending the Object directly from the controller method
        Let's see the example.
        Example 2: Controller without ResponseEntity
        Following controller which returns the list of Tags as a JSON response. Notice that the method returns List and not ResponseEntity.
        package com.bootng;
        
        import java.util.List;
        import org.slf4j.Logger;
        import org.slf4j.LoggerFactory;
        import org.springframework.beans.factory.annotation.Autowired;
        import org.springframework.http.HttpHeaders;
        import org.springframework.http.HttpStatus;
        import org.springframework.http.MediaType;
        import org.springframework.http.ResponseEntity;
        import org.springframework.web.bind.annotation.RequestMapping;
        import org.springframework.web.bind.annotation.RequestMethod;
        import org.springframework.web.bind.annotation.RestController;
        import com.bootng.beans.AppException;
        
        
        @RestController
        @RequestMapping("/blogapi")
        public class TagAPIController {
        
          private static final Logger log = LoggerFactory.getLogger(TagAPIController.class);
        
          @Autowired
          BlogService blogService;
          @RequestMapping(value = {"v3/tags"}, method = RequestMethod.GET,
              produces = MediaType.APPLICATION_JSON_VALUE)
          public List getTagsV3() {
            List tags = null;
            try {
              tags = blogService.getBlogTags();
            } catch (AppException e) {
              log.error(e.getMessage());
            }
            return tags;
          }
        }
        Response from both the above API / v3/tags and /v1/tags looks the same.
        Example 3
        In this example, we are writing the controller with HttpServletResponse as a parameter. This allows us to set the header and status directly on the object.
        package com.bootng;
        @RequestMapping(value = {"/welcome"}, method = RequestMethod.GET,
              produces = MediaType.APPLICATION_JSON_VALUE)
        void welcome(HttpServletResponse response) throws IOException {
            response.setHeader("Custom-Header-Message-Type", "welcome_user");
        response.setHeader("Custom-Header-Message-LANG", "en-us");
            response.setStatus(200);
            response.getWriter().println("Welcome");
        }
        Conclusions
        • We saw how to write a REST controller using ResponseEntity and without using ResponseEntity.
        • ResponseEntity makes it easy to set common HTTP Response elements like status code, headers, etc.
        • ResponseEntity is definitely useful but makes the overall controller method less readable the controller method return type is now ResponseEntity wrapped actual return type.

        References

        Spring Boot REST API example

        REST is an acronym for REpresentational State Transfer. In this article, we will walk through a sample REST application built using Spring Boot. This application does not use any database to store data, all the data is in memory. We will expose a few REST endpoints. Main purpose of this article is to demonstrate how to build REST API's using Spring boot.

        Application Details

        This application is about building a backend for a Blog software and exposing two REST API endpoints.
        Following two endpoints both returns response in JSON format.
        /blogapi/blogs : Returns list of blogs
        /blogapi/blogs/ID : Returns details of a specific blog
        Technology Used
        • Spring Boot 2.2.6.RELEASE
        • Logback 1.2.3
        • Maven 3
        • Java 11
        • Jackson 2.10.3

        Project Structure


        Code Reference

        Maven pom.xml
        <?xml version="1.0" encoding="UTF-8"?>
        <project xmlns="http://maven.apache.org/POM/4.0.0"
        	xmlns:xsi="http://www.w3.org/2001/XMLSchema-instance"
        	xsi:schemaLocation="http://maven.apache.org/POM/4.0.0 http://maven.apache.org/xsd/maven-4.0.0.xsd">
        	<modelVersion>4.0.0</modelVersion>
        	<artifactId>com.bootng.rest</artifactId>
        	<version>1.0.0-SNAPSHOT</version>
        	<packaging>war</packaging>
        	<name>Spring Boot Rest</name>
        	<description>Springboot Rest App</description>
        	<parent>
        		<groupId>org.springframework.boot</groupId>
        		<artifactId>spring-boot-starter-parent</artifactId>
        		<version>2.2.6.RELEASE</version>
        		<relativePath />
        	</parent>
        	<properties>
        		<project.build.sourceEncoding>UTF-8</project.build.sourceEncoding>
        		<project.reporting.outputEncoding>UTF-8</project.reporting.outputEncoding>
        		<java.version>1.8</java.version>
        	</properties>
        	<dependencies>
        		<dependency>
        			<groupId>org.springframework.boot</groupId>
        			<artifactId>spring-boot-starter-web</artifactId>
        		</dependency>
        		<!-- https://mvnrepository.com/artifact/org.springframework/spring-test -->
        		<dependency>
        			<groupId>org.springframework</groupId>
        			<artifactId>spring-test</artifactId>
        			<scope>test</scope>
        		</dependency>
        		<!-- junit 5 -->
        		<dependency>
        			<groupId>org.junit.jupiter</groupId>
        			<artifactId>junit-jupiter-engine</artifactId>
        			<scope>test</scope>
        		</dependency>
        		<dependency>
        			<groupId>org.mockito</groupId>
        			<artifactId>mockito-core</artifactId>
        			<version>2.19.0</version>
        			<scope>test</scope>
        		</dependency>
        		<dependency>
        			<groupId>org.junit.jupiter</groupId>
        			<artifactId>junit-jupiter-api</artifactId>
        		</dependency>
        	</dependencies>
        	<build>
        		<plugins>
        			<plugin>
        				<groupId>org.springframework.boot</groupId>
        				<artifactId>spring-boot-maven-plugin</artifactId>
        				<configuration>
        					<addResources>true</addResources>
        				</configuration>
        				<executions>
        					<execution>
        						<goals>
        							<goal>repackage</goal>
        						</goals>
        					</execution>
        				</executions>
        			</plugin>
        		</plugins>
        	</build>
        </project>
        BlogStory Model
        BlogStory model class which represent a blog entry.
        package com.bootng.model;
        
        public class BlogStory {
          private String id;
          private String name;
          private String summary;
          private String description;
          private String category;
          public BlogStory() {
          }
          public BlogStory (String name, String category, String summary) {
            this.id = name.replaceAll(" ","_");
            this.name = name;
            this.summary = summary;
            this.category = category;
            this.description = summary + "Lorem ipsum dolor sit amet, consectetur adipiscing elit, sed do eiusmod tempor incididunt "
                + "ut labore et dolore magna aliqua. "
                + "Ut enim ad minim veniam, quis nostrud exercitation ullamco laboris nisi ut aliquip ex ea commodo consequat."
                + " Duis aute irure dolor in reprehenderit in voluptate velit esse cillum "
                + "dolore eu fugiat nulla pariatur. Excepteur sint occaecat cupidatat non proident, "
                + "sunt in culpa qui officia deserunt mollit anim id est laborum" ;   
          }
        // Setters
         
        }
        BlogService Class
        Service class which returns list of available blogs. Blog with an id etc.
        @Service
        public class BlogService {
          List category = Arrays.asList("Technical", "Travel", "Food", "Finance", "Entertainment");
          List stories = new ArrayList();
          {
            stories.add(new BlogStory("Java 11", "Technical", "Java 11 Blog"));
            stories.add(new BlogStory("Java 14", "Technical", "Java 14 Blog"));
            stories.add(new BlogStory("Asia Travel", "Travel", "Places to visit in Asia"));
            stories.add(new BlogStory("Europe Travel", "Travel", "Places to visit in Europe"));
            stories.add(new BlogStory("Japan Travel", "Travel", "Places to visit in Japan"));
            stories.add(new BlogStory("Asian Food", "Food", "Asian Food......"));
          }
        
          public BlogStory getBlogStory(String id) throws AppException {
            return stories.stream().filter(story -> id.equals(story.getId())).findAny().orElse(null);
          }
        
          public List getBlogStory() throws AppException {
            return stories;
          }
        
          public void addStory(BlogStory newStory) throws AppException {
            this.stories.add(newStory);
          }
        
          public List getBlogTags() throws AppException {
            return category;
          }
        }
        Main Application Class
        Spring Boot's main application class.
        @ComponentScan({"com.bootng"})
        @SpringBootApplication
        public class RestApplication {
          public static void main(String args[]) {
            SpringApplication.run(RestApplication.class, args);
          }
        }
        BlogAPIController Controller Class
        Controller class which exposes the two endpoints
        GET /blogapi/blogs
        and GET /blogapi/blogs/ID
        @Controller annotation is used to mark this class as a Controller.
        @RequestMapping is used to map the request paths "/blogs" to getBlogSotries method and /blog/ID to getBlogStory method.
        In both cases we are mapping both the paths to HTTP GET verb by using method = RequestMethod.GET
        @ResponseBody is used to convert the result to JSON (as we specified by produces=MediaType.APPLICATION_JSON_VALUE)
        @Controller
        @RequestMapping("/blogapi")
        public class BlogAPIController {
        private static final Logger log = LoggerFactory.getLogger(BlogAPIController.class);
        @Autowired
        BlogService blogService;
        ResponseEntity apiResponse = new ResponseEntity(newStory, HttpStatus.OK);
            return apiResponse;
        }
        
        @RequestMapping(value = {"/blogs"}, method = RequestMethod.GET,
              produces = MediaType.APPLICATION_JSON_VALUE)
          public @ResponseBody ResponseEntity> getBlogStories() {
            log.info("inside getBlogStories GET method");
            List blogStory = null;
            ResponseEntity> apiResponse;
            try {
              blogStory = blogService.getBlogStory();
              apiResponse = new ResponseEntity>(blogStory, HttpStatus.OK);
            } catch (AppException e) {
              apiResponse =
                  new ResponseEntity>(blogStory, HttpStatus.INTERNAL_SERVER_ERROR);
              e.printStackTrace();
            }
            return apiResponse;
          }
        
        @RequestMapping(value = {"/blogs"}, method = RequestMethod.GET,
              produces = MediaType.APPLICATION_JSON_VALUE)
          public @ResponseBody ResponseEntity getBlogStory(@PathParam(value = "") String id) {
            log.info("inside blog GET method");
            BlogStory blogStory = null;
            ResponseEntity apiResponse;
            try {
              blogStory = blogService.getBlogStory(id);
              if (blogStory == null)
                apiResponse = new ResponseEntity(blogStory, HttpStatus.NOT_FOUND);
              else
                apiResponse = new ResponseEntity(blogStory, HttpStatus.OK);
            } catch (AppException e) {
              apiResponse = new ResponseEntity(blogStory, HttpStatus.INTERNAL_SERVER_ERROR);
              e.printStackTrace();
            }
            return apiResponse;
          }
        }

        Start Application

        Run Application
        Build the project using mvn clean install and then run it with mvn spring-boot:run
        mvn clean install
        mvn spring-boot:run

        Call REST API's using CURL

        CURL: Get list of Blogs
        Using curl we can get list of blogs from the /blogs endpoint
        curl -X GET  http://localhost:8080/blogapi/blogs 
        CURL: Get specific blog details
        Get a specific blog with id "Java_14" by calling /blogs/Java_14
        curl -X GET localhost:8080/blogapi/blogs/Java_14
        Git Source Code
        • git clone https://github.com/siddharthagit/spring-boot-references
        • cd springboot-rest
        • mvn clean install
        • mvn spring-boot:run

          Conclusion

          In this article, we used Springs RestController annotation to build the API. With Spring boot we can use other frameworks like Jersey, Restlet, etc also to build API.

          Spring RestController vs Controller

          Spring 4 introduced a new annotation called RestController. It makes writing REST controllers a little easy as we don't have to repeat the @ResponseBody annotations in each and every controller method. In this short article, we will examine how to write the REST API controller using both the annotations. While writing the REST controller it is recommended to use @RestController rather then @Controller.

          @Controller Example

          Controller annotation is a classic annotation which marks a Class as a controller and helps Spring to autodetect these Classes though Class scanning. While developing REST API in Spring Boot, we can mark a Class as Controller. We then need to use the @ResponseBody annotation to be used so that whatever the method returns can be serialized.
          In this article, we will go through two examples a simple Controller which returns a list of categories and tags as JSON response respectively using both these annotations.

          Let's see an example with Controller annotation.
          CategoryController controller contains a method "getBlogCats" that returns a list of categories, it is mapped to the request path "/blogapi/categories". Here we are using @Controller annotation to mark this class as Controller. We need to use @ResponseBody annotation in the method getBlogCats so that List can be serialized and sent back to the client as Web response.
          CategoryController Class
          @Controller
          @RequestMapping("/blogapi")
          public class CategoryController {
          
            private static final Logger log = LoggerFactory.getLogger(CategoryController.class);
          
            @Autowired
            BlogService blogService;
          
            @RequestMapping(value = {"/categories"}, method = RequestMethod.GET,
                produces = MediaType.APPLICATION_JSON_VALUE)
            public @ResponseBody ResponseEntity<List<String>> getBlogCats() {
              ResponseEntity<List<String>> apiResponse;
              try {
                List<String> categories = blogService.getBlogCategories();
                apiResponse = new ResponseEntity<List<String>>(categories, HttpStatus.OK);
              } catch (AppException e) {
                apiResponse = new ResponseEntity<List<String>>(HttpStatus.INTERNAL_SERVER_ERROR);
                log.error(e.getMessage());
              }
              return apiResponse;
            }
          }
          Next we will see a REST controller with @RestController. This Controller creates a GET REST endpoint that returns a list of Tags. It can be accessed as GET /blogapi/tags. The method getBlogTags() returns ResponseEntity>. Since we are marking the Class with @RestController, Spring will serialize the return type to HTTP response body and return to the client. Notice that we don't need to use @ResponseBody annotation.

          @RestController Example

          TagAPIController.Java
          @RestController
          @RequestMapping("/blogapi")
          public class TagAPIController {
            private static final Logger log = LoggerFactory.getLogger(TagAPIController.class);
            @Autowired
            BlogService blogService;
          
            @RequestMapping(value = {"/tags"}, method = RequestMethod.GET,
                produces = MediaType.APPLICATION_JSON_VALUE)
            public ResponseEntity getBlogTags() {
              ResponseEntity<List<String>> apiResponse;
              try {
                List<String> tags = blogService.getBlogTags();
                apiResponse = new ResponseEntity<List<String>>(tags, HttpStatus.OK);
              } catch (AppException e) {
                apiResponse = new ResponseEntity<List<String>>(HttpStatus.INTERNAL_SERVER_ERROR);
                log.error(e.getMessage());
              }
              return apiResponse;
            }
          }
          In this example since we marked the controller with @RestController , we don't need to mark getBlogTags with @ResponseBody explicitly.
          Summary
          • @RestController is available from Spring 4.0 onwards.
          • @RestController is a composed annotation containing both @Controller and @ResponseBody annotations.
          • While writing REST controller it is better to use @RestController.
          • In this article, we have seen two different Controllers one using @Controller and another using @RestController.

          References


          Spring boot custom banner

          Spring boot application while starting shows a number of useful information in the console. Generally, the console output will start with a spring boot banner. Like one bellow. In this article we will cover how to change the default banner and turning it on or off etc.
            .   ____          _            __ _ _
           /\\ / ___'_ __ _ _(_)_ __  __ _ \ \ \ \
          ( ( )\___ | '_ | '_| | '_ \/ _` | \ \ \ \
           \\/  ___)| |_)| | | | | || (_| |  ) ) ) )
            '  |____| .__|_| |_|_| |_\__, | / / / /
           =========|_|==============|___/=/_/_/_/
           :: Spring Boot ::        (v2.2.6.RELEASE)
          

          How to Turn banner off

          We can turn off the banner by configuration changes or by java code change. Following section shows how to turn of the banner in both ways.
          application.properties
          The banner can be turned off by setting spring.main.banner-mode to off in application.properties file
          spring.main.banner-mode=off
          The following code demonstrates how we can set the banner mode off though java code in the Main application file.
          Main Application Class
          @SpringBootApplication
          public class HelloApplication implements CommandLineRunner {
            private static final Logger log = LoggerFactory.getLogger(HelloApplication.class);
            public static void main(String[] args) {
              var app = new SpringApplication(HelloApplication.class);
              app.setBannerMode(Banner.Mode.OFF);
              app.run(args);
            }
            @Autowired
            HelloService service;
          
            @Override
            public void run(String... args) throws Exception {
              log.info(service.hello());
            }
          }

          Changing the banner

          We can change the banner by providing ASCII banner contents in a file and specifying the file location in application.properties.
          spring.banner.location points to the banner file. We can also specify additional properties in the banner.txt file. For instance, in the following example, we are specifying application.title, application.version, etc. to be displayed under the banner "bootng"

          Code Details

          my-banner.txt
          ASCII banner content. We are using SpringBoot constants AnsiColor.RED to specify the color of the banner text.
           ${AnsiColor.RED}
           _                    _                 
          | |                  | |                
          | |__    ___    ___  | |_  _ __    __ _ 
          | '_ \  / _ \  / _ \ | __|| '_ \  / _` |
          | |_) || (_) || (_) || |_ | | | || (_| |
          |_.__/  \___/  \___/  \__||_| |_| \__, |
                                             __/ |
                                            |___/ 
          Application Name: ${application.title}
          Application Version: ${application.version}  
          Spring Boot Version: ${spring-boot.version}
          ${AnsiColor.DEFAULT}
          application.properties
          #spring.main.banner-mode=off
          spring.banner.location=classpath:my-banner.txt
          application.title=Spring Boot Standalone App
          application.version=1.0.0

          Run The Application

          mvn spring-boot:run
          Console output
           _                    _
          | |                  | |
          | |__    ___    ___  | |_  _ __    __ _
          | '_ \  / _ \  / _ \ | __|| '_ \  / _` |
          | |_) || (_) || (_) || |_ | | | || (_| |
          |_.__/  \___/  \___/  \__||_| |_| \__, |
                                             __/ |
                                            |___/
          
          Application Name: Spring Boot Standalone App
          Application Version:
          Spring Boot Version: 2.2.6.RELEASE
          

          Git Source code

          • git clone https://github.com/siddharthagit/spring-boot-references
          • cd spring-boot-standalone-app
          • mvn clean install
          • mvn spring-boot:run

            How to create Stand alone app?

            With Spring Boot we can also create a stand-alone application, which does not need any web server or application server to run. In this article, we will go through a very simple Spring boot stand-alone application using the CommandLineRunner interface.
            We will go through a very simple Spring Boot application trying to understand how CommandLineRunner works and what are the alternatives to CommandLineRunner interface like Application Runner. CommandLineRunner : This interface can be used to dictate that a class that implements this interface should be executed once the SpringApplication context loaded. This interface has a single method "run" which takes String array as arguments. ApplicationRunner : Similar to CommandLineRunner how it works, it also has only one method "run", which gets executed once the SpringBoot Context loads. The only difference between these two interfaces is argument types. the run method in ApplicationRunner accepts an array of ApplicationArguments whereas run method in CommandLineRunner accepts array or Strings.
            CommandLineRunner.java
            Definition of CommandLineRunner interface. Note that it is a Functional interface, meaning it has only one method.
            @FunctionalInterface
            public interface CommandLineRunner {
            	/**
            	 * Callback used to run the bean.
            	 * @param args incoming main method arguments
            	 * @throws Exception on error
            	 */
            	void run(String... args) throws Exception;
            }

            Technology Used

            • Java 11
            • Apache Maven 3.5.0
            • Spring Boot 2.2.6
            • Logback 1.2.3
            • Eclipse IDE

            Code Structure


            Application Details

            pom.xml
            <?xml version="1.0" encoding="UTF-8"?>
            <project xmlns="http://maven.apache.org/POM/4.0.0"
            	xmlns:xsi="http://www.w3.org/2001/XMLSchema-instance"
            	xsi:schemaLocation="http://maven.apache.org/POM/4.0.0 http://maven.apache.org/xsd/maven-4.0.0.xsd">
            	<modelVersion>4.0.0</modelVersion>
            	<artifactId>bootng-springboot-hello</artifactId>
            	<version>1.0.0</version>
            	<packaging>jar</packaging>
            	<name>Spring Boot Standalone App</name>
            	<description>Spring Boot Hello Standalone Application</description>
            	<parent>
            		<groupId>org.springframework.boot</groupId>
            		<artifactId>spring-boot-starter-parent</artifactId>
            		<version>2.2.6.RELEASE</version>
            		<relativePath />
            	</parent>
            	<properties>
            		<project.build.sourceEncoding>UTF-8</project.build.sourceEncoding>
            		<project.reporting.outputEncoding>UTF-8</project.reporting.outputEncoding>
            		<java.version>1.8</java.version>
            	</properties>
            	<dependencies>
            	<dependency>
                     <groupId>org.springframework.boot</groupId>
                     <artifactId>spring-boot-starter</artifactId>
                  </dependency>
            	<dependency>
                     <groupId>org.springframework.boot</groupId>
                     <artifactId>spring-boot-starter-test</artifactId>
                     <scope>test</scope>
                  </dependency>
            	</dependencies>
            	<build>
            		<plugins>
            			<plugin>
            				<groupId>org.springframework.boot</groupId>
            				<artifactId>spring-boot-maven-plugin</artifactId>
            				<configuration>
            					<addResources>true</addResources>
            				</configuration>
            			</plugin>
            		</plugins>
            	</build>
            </project>
            HelloService
            Our service Class defines three methods hello, bye, and onDestroy marked with @PreDestroy annotation.
            package com.bootng;
            import javax.annotation.PreDestroy;
            import org.slf4j.Logger;
            import org.slf4j.LoggerFactory;
            import org.springframework.stereotype.Service;
            
            @Service
            public class HelloService {
              private static final Logger log = LoggerFactory.getLogger(HelloService.class);
              public String hello() {
                return "Hello Spring Boot!";
              }
              @PreDestroy
              public void onDestroy() throws Exception {
                log.info("Spring Container is destroyed!");
                bye();
              }
              public String bye() {
                String msg = "Bye..... Have a nice day!";
                log.info(msg);
                return msg;
              }
            }
            
            HelloApplication Class
            Our HelloApplication Class implements CommandLineRunner interface. We inject the HelloService using @Autowired annotation. In the run method, we call the service.hello method.
            package com.bootng;
            
            import org.springframework.beans.factory.annotation.Autowired;
            import org.springframework.boot.CommandLineRunner;
            import org.springframework.boot.autoconfigure.SpringBootApplication;
            import org.springframework.context.annotation.ComponentScan;
            import org.slf4j.Logger;
            import org.slf4j.LoggerFactory;
            
            @ComponentScan({"com.bootng"})
            @SpringBootApplication
            public class HelloApplication implements CommandLineRunner {
              private static final Logger log = LoggerFactory.getLogger(HelloApplication.class);
              @Autowired
              HelloService service;
              @Override
              public void run(String... args) throws Exception {
                log.info(service.hello());
              }
            }

            Running the application

            Run the application by executing the following command
            mvn spring-boot:run
            Console Output
            20-June-01 16:28:57:549 INFO main c.b.HelloApplication:651 - No active profile set, falling back to default profiles: default 20-June-01 16:28:57:844 INFO main c.b.HelloApplication:61 - Started HelloApplication in 0.64 seconds (JVM running for 0.872) 20-June-01 16:28:57:845 INFO main c.b.HelloApplication:26 - Hello Spring Boot! 20-June-01 16:28:57:846 INFO SpringContextShutdownHook c.b.HelloService:21 - Spring Container is destroyed! 20-June-01 16:28:57:847 INFO SpringContextShutdownHook c.b.HelloService:27 - Bye..... Have a nice day!
            We can see the application will execute and terminate with messages like "Hello Spring Boot!" and Bye..."Have a nice day!"
            First message is printed by run->service.hello() method as soon as the application starts.
            The second message is somewhat special and is printed by invoking service.bye() by the Spring framework before the application exits.
            Git Source Code
            • git clone https://github.com/siddharthagit/spring-boot-references
            • cd spring-boot-standalone-app
            • mvn clean install
            • mvn spring-boot:run

              Summary

              Using CommandLineRunner we can create a stand alone Spring Boot application
              We can use the @PreDestroy to call methods from service class before it is unloaded by Spring while exiting the application


              Testing Spring Boot App with JUnit 5 and Mockito

              Writing Unit Tests for an application is very important to make sure the software works as expected. JUnit 5 is the latest release of Junit 5 and it is already gaining popularity. In this article, we will walk through a simple Spring Boot Application and will write unit tests using Junit and Mockito.

              Purpose

              Before we dig into would like to give a broad overview of JUnit 5 and Mockito. Junit5 is the latest release of Junit, it is much different then Junit4, so many of the Junit4 specific annotations do not work with Junit 5. Mockito is a mocking framework and is very popular in the Opensource community. With Mockito we can mock an object or a method. For example in this article, we will be writing unit testing for the controller and we will mock the service layer.

              Application Details

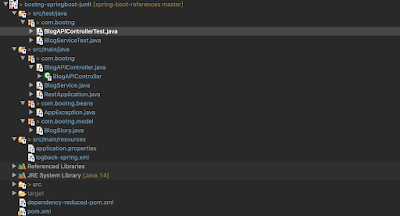
              The Spring boot application we are building here is a simple App with one controller and one service class. The application creates rest endpoints (/blogs, /blogs/ID) through which we can get the list of blogs and specific blog details.

              Code Structure

              Spring Boot JUNIT5 Project Structure


              Code details

              pom.xml
              <?xml version="1.0" encoding="UTF-8"?>
              <project xmlns="http://maven.apache.org/POM/4.0.0"
               xmlns:xsi="http://www.w3.org/2001/XMLSchema-instance"
               xsi:schemaLocation="http://maven.apache.org/POM/4.0.0 http://maven.apache.org/xsd/maven-4.0.0.xsd">
               <modelVersion>4.0.0</modelVersion>
               <artifactId>com.bootng.springboot-rest</artifactId>
               <version>1.0.0-SNAPSHOT</version>
               <packaging>war</packaging>
               <name>bootngSpringboot  Rest</name>
               <description>bootng Springboot Rest</description>
               <parent>
                <groupId>org.springframework.boot</groupId>
                <artifactId>spring-boot-starter-parent</artifactId>
                <version>2.2.6.RELEASE</version>
                <relativePath />
               </parent>
               <properties>
                <project.build.sourceEncoding>UTF-8</project.build.sourceEncoding>
                <project.reporting.outputEncoding>UTF-8</project.reporting.outputEncoding>
                <java.version>1.8</java.version>
               </properties>
               <dependencies>
                <dependency>
                 <groupId>org.springframework.boot</groupId>
                 <artifactId>spring-boot-starter-web</artifactId>
                </dependency>
                <!-- https://mvnrepository.com/artifact/org.springframework/spring-test -->
                <dependency>
                 <groupId>org.springframework</groupId>
                 <artifactId>spring-test</artifactId>
                 <scope>test</scope>
                </dependency>
                <!-- junit 5 -->
                <dependency>
                 <groupId>org.junit.jupiter</groupId>
                 <artifactId>junit-jupiter-engine</artifactId>
                 <scope>test</scope>
                </dependency>
                <dependency>
                 <groupId>org.mockito</groupId>
                 <artifactId>mockito-core</artifactId>
                 <version>2.19.0</version>
                 <scope>test</scope>
                </dependency>
                <dependency>
                 <groupId>org.junit.jupiter</groupId>
                 <artifactId>junit-jupiter-api</artifactId>
                </dependency>
               </dependencies>
               <build>
                <plugins>
                 <plugin>
                  <groupId>org.springframework.boot</groupId>
                  <artifactId>spring-boot-maven-plugin</artifactId>
                  <configuration>
                   <addResources>true</addResources>
                  </configuration>
                  <executions>
                   <execution>
                    <goals>
                     <goal>repackage</goal>
                    </goals>
                   </execution>
                  </executions>
                 </plugin>
                </plugins>
               </build>
              </project>
              
              RestApplication.java
              Our main application class.
              package com.bootng;
              
              import org.springframework.boot.SpringApplication;
              import org.springframework.boot.autoconfigure.SpringBootApplication;
              import org.springframework.context.annotation.ComponentScan;
              import org.slf4j.Logger;
              import org.slf4j.LoggerFactory;
              
              @ComponentScan({"com.bootng"})
              @SpringBootApplication
              public class RestApplication {
                private static final Logger log = LoggerFactory.getLogger(RestApplication.class);
                public static void main(String args[]) {
                  log.info("about to call RestApplication.run()");
                  SpringApplication.run(RestApplication.class, args);
                  log.info("completed executing RestApplication.run()");
                }
              }
              
              BlogService.java
              Our service class which has three methods getBlogStory(String id), getBlogStory() and getBlogTags() respectively. Controller class which exposes the REST endpoints will call these methods.
              @Service
              public class BlogService {
                List category = Arrays.asList("Technical", "Travel", "Food", "Finance", "Entertainment");
                List stories = new ArrayList();
                {
                  stories.add(new BlogStory("Java 11", "Technical", "Java 11 Blog"));
                  stories.add(new BlogStory("Java 14", "Technical", "Java 14 Blog"));
                  stories.add(new BlogStory("Asia Travel", "Travel", "Places to visit in Asia"));
                  stories.add(new BlogStory("Europe Travel", "Travel", "Places to visit in Europe"));
                  stories.add(new BlogStory("Japan Travel", "Travel", "Places to visit in Japan"));
                  stories.add(new BlogStory("Asian Food", "Food", "Asian Food......"));
                }
              
                public BlogStory getBlogStory(String id) throws AppException{
                  return stories.stream().filter(story -> id.equals(story.getId())).findAny().orElse(null);
                }
                public List getBlogStory() throws AppException {
                  return stories;
                }
                public List getBlogTags() throws AppException{
                  return category;
                }
              }
              BlogAPIController.java
              Controller class which creates two rest endpoints /blogs and /blog/ID. Both methods might return an error responses.
              @Controller
              @RequestMapping("/blogapi")
              public class BlogAPIController {
                private static final Logger log = LoggerFactory.getLogger(BlogAPIController.class);
                @Autowired
                BlogService blogService;
              
                @RequestMapping(value = {"/blogs"}, method = RequestMethod.GET,
                    produces = MediaType.APPLICATION_JSON_VALUE)
                public @ResponseBody ResponseEntity> getBlogStories() {
                  log.info("inside getBlogStories GET method");
                  List blogStory = null;
                  ResponseEntity> apiResponse;
                  try {
                    blogStory = blogService.getBlogStory();
                    apiResponse = new ResponseEntity>(blogStory, HttpStatus.OK);
                  } catch (AppException e) {
                    apiResponse = new ResponseEntity>(blogStory, HttpStatus.INTERNAL_SERVER_ERROR);
                    e.printStackTrace();
                  }
                  return apiResponse;
                }
                
                @RequestMapping(value = {"/blog"}, method = RequestMethod.GET,
                    produces = MediaType.APPLICATION_JSON_VALUE)
                public @ResponseBody ResponseEntity  getBlogStory(@PathParam(value = "") String id) {
                  log.info("inside blog GET method");
                  BlogStory blogStory = null;
                  ResponseEntity  apiResponse;
                  try {
                    blogStory = blogService.getBlogStory(id);
                    if (blogStory == null) 
                      apiResponse = new ResponseEntity(blogStory, HttpStatus.NOT_FOUND);
                    else
                      apiResponse = new ResponseEntity(blogStory, HttpStatus.OK);
                  } catch (AppException e) {
                    apiResponse = new ResponseEntity(blogStory, HttpStatus.INTERNAL_SERVER_ERROR);
                    e.printStackTrace();
                  }
                   return apiResponse;
                }
              }
              BlogServiceTest.java
              In this Test class, we are testing the two methods of the Service class. We get an autowired instance of the BlogService class. We use the @ExtendWith annotation of JUnit5 . We also use the @ContextConfiguration annotation from Spring Boot to load the appropriate context.
              @ExtendWith(SpringExtension.class)
              @ContextConfiguration(classes = {BlogService.class})
              public class BlogServiceTest {
              
                @Autowired
                BlogService service;
              
                @Test
                public void test_getBlogStory() {
                  List list;
                  try {
                    list = service.getBlogStory();
                    Assertions.assertNotNull(list, "list should not be null");
                  } catch (AppException e) {
                    // TODO Auto-generated catch block
                    e.printStackTrace();
                  }
                }
              
                @Test
                public void test_getBlogStory_with_id() {
                  BlogStory data;
                  try {
                    data = service.getBlogStory("Java_11");
                    Assertions.assertNotNull(data, "data should not be null");
                  } catch (AppException e) {
                    // TODO Auto-generated catch block
                    e.printStackTrace();
                  }
                }
              }
              @ExtendWith(SpringExtension.class)
              @ContextConfiguration(classes = {BlogAPIController.class, BlogService.class})
              @TestInstance(TestInstance.Lifecycle.PER_CLASS)
              public class BlogAPIControllerTest {
                
                @Mock
                BlogService blogService;
                
                @InjectMocks
                private BlogAPIController controller;
                
                @BeforeAll
                public void setup() {
                    MockitoAnnotations.initMocks(this);
                }
                
                @Test
                public void contextLoads() {}
                
                @Test
                public void test_getBlogStories() throws AppException {
                  
                  when(blogService.getBlogStory()).thenReturn(new ArrayList());
                  
                  ResponseEntity> object = controller.getBlogStories();
                  
                  Assertions.assertEquals(HttpStatus.OK, object.getStatusCode(), "OK Status");
                  
                }
                
                @Test
                public void test_getBlogStory_not_found() throws AppException {
                  
                  when(blogService.getBlogStory("444")).thenReturn(null);
                  
                  ResponseEntity object = controller.getBlogStory("444");
                  
                  Assertions.assertEquals(HttpStatus.NOT_FOUND, object.getStatusCode(), "OK Status");
                  
                }
              
              }
              BlogAPIControllerTest
              Our controller test class. In this class we use Mokito to inject a mocked BlogService, then we can use the stubbing method like "when" to return different results from the service class.
              @ExtendWith(SpringExtension.class)
              @ContextConfiguration(classes = {BlogAPIController.class, BlogService.class})
              @TestInstance(TestInstance.Lifecycle.PER_CLASS)
              public class BlogAPIControllerTest {
                
                @Mock
                BlogService blogService;
                
                @InjectMocks
                private BlogAPIController controller;
                
                @BeforeAll
                public void setup() {
                    MockitoAnnotations.initMocks(this);
                }
               
                @Test
                public void contextLoads() {}
                
                @Test
                public void test_getBlogStories_success() throws AppException {
                  
                  when(blogService.getBlogStory()).thenReturn(new ArrayList());
                  
                  ResponseEntity> object = controller.getBlogStories();
                  
                  Assertions.assertEquals(HttpStatus.OK, object.getStatusCode(), "OK Status");
               }
                
                @Test
                public void test_getBlogStory_Not_found() throws AppException {
                  
                  when(blogService.getBlogStory("444")).thenReturn(null);
                  
                  ResponseEntity object = controller.getBlogStory("444");
                  
                  Assertions.assertEquals(HttpStatus.NOT_FOUND, object.getStatusCode(), "OK Status");
                }
              
              }

              Summary

              What is covered
              In this article, we saw how to write a simple Spring Boot Application. Write Unit tests and execute unit tests. Mock service classes.
              Source code and Build
              git clone https://github.com/bootng/spring-boot-references cd springboot-junit #build the application mvn install #run the tests mvn test

              Setting and Reading Active Profiles

              This article shows different ways to set the active profile that requires java code change. We can then activate different profiles in different environments based on some application logics. Also, we can list the list of active profiles as shown in the below examples. The article is divided into two sections, one for setting the active profile and the other one is listing the active profiles.

              Setting though setAdditionalProfiles.

              RestApplication
              The following example shows how to set the active profile "prod" by calling setAdditionalProfiles from the Spring Application Class. We need to set the profiles before the run method.
              import org.springframework.boot.SpringApplication;
              import org.springframework.boot.autoconfigure.SpringBootApplication;
              import org.springframework.context.annotation.ComponentScan;
              import org.slf4j.Logger;
              import org.slf4j.LoggerFactory;
              
              @ComponentScan({"com.bootng", "com.bootng.service"})
              @SpringBootApplication
              public class RestApplication {
              
                private static final Logger log = LoggerFactory.getLogger(RestApplication.class);
              
                public static void main(String args[]) {
                  log.info("about to call RestApplication.run()");
              
                  // set extra profile
                  SpringApplication application = new SpringApplication(RestApplication.class);
                  application.setAdditionalProfiles("prod");
                  application.run(args);
                  log.info("completed executing RestApplication.run()");
                }
              }

              Listing Active Spring Boot Profiles by @Value

              @Value
              the property spring.profiles.active contains the list of active profiles. We can read this value by @Value annotations
              @Value("${spring.profiles.active:}")

              Listing Active Spring Boot Profiles by Environment

              Through org.springframework.core.env.Environment
              The following code shows how to read the list of active profiles by using org.springframework.core.env.Environment object.
              @Autowired
              private Environment environment;
              
              //read the active profiles from environment object.
              String result = "Currently active profile - ";
              for (String profileName : environment.getActiveProfiles()) {
                  result+=" " + profileName;
              }  

              References


              How to set active profiles

              Spring Boot applications can have more than one Profiles. Sometimes we need to set the active profile so that the application reads the appropriate properties or Beans. This article demonstrates some of the different ways to set the Spring Active Profile though properties file and environment variables setting which does not need code chage.

              By application.properties

              Set Active Spring Profiles In the application.properties file
              We can set active profiles for Spring Boot applications in the application.properties file, as shown in the bellow. Here we are setting prod profile as active profile.
              spring.profiles.active=prod
              

              Environment variable

              Set Active Spring Profiles by setting an Environment variable
              Following example, we are setting the Environment variable, which would be read by the Spring Boot Application.
              export spring_profiles_active=dev

              JVM System Properties

              Set Active Spring Profiles by using JVM System Properties
              Following the example, we are setting the active profile by setting JVM system property Dspring.profiles.active.
              java -jar -Dspring.profiles.active=prod bootng-springboot-profiles-1.0.0-SNAPSHOT.jar


              With Maven plugin

              When using Maven plugin use the following command to pass the active profiles.
              mvn spring-boot:run -Dspring-boot.run.profiles=prod,dev

              References