Example with Spring Profiles

In continuation of the Spring Boot profiles, in this article we will walk through different use cases. We will see how to read property files and display them through a controller. We have following use cases 1)Defining and reading profile-specific beans 2) populating beans from a properties file.

Purpose

In this article, we will build a Spring Boot Application with a two-controller and 2 profile-specific configuration files.

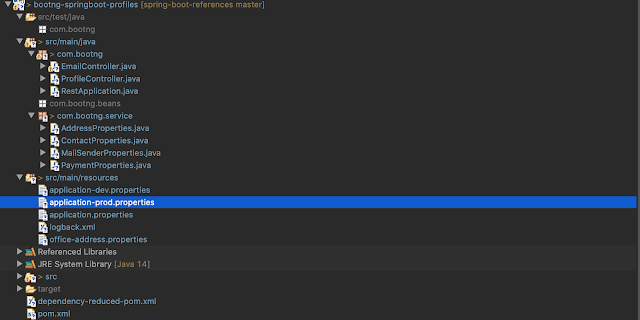
Code structure


Spring Boot Application Structure


Technology Used
Java 11
Spring Boot 2.2.6.RELEASE
Maven 3.5.0
Eclipse IDE

Application details

This application we have one controller EmailController which shows some data to the response. These data are collected from different Java classes. Each java class is populated by Spring in a different way. PaymentProperties: This defines a bean-based on profile. When we read the bean PaymentProp from EmailController it shows the data based on the active profile. MailSenderProperties: It is populated by the active profile property file. ContactProperties and AddressProperties: These objects are populated from the respective properties file and have nothing to do with an active profile.

Code details

pom.file
<?xml version="1.0" encoding="UTF-8"?>
<project xmlns="http://maven.apache.org/POM/4.0.0"
 xmlns:xsi="http://www.w3.org/2001/XMLSchema-instance"
 xsi:schemaLocation="http://maven.apache.org/POM/4.0.0 http://maven.apache.org/xsd/maven-4.0.0.xsd">
 <modelVersion>4.0.0</modelVersion>
 <artifactId>bootng-springboot-profiles</artifactId>
 <version>1.0.0-SNAPSHOT</version>
 <packaging>war</packaging>
 <name>com.bootng Springboot Profile</name>
 <description>com.bootng Springboot Profile</description>
 <parent>
  <groupId>org.springframework.boot</groupId>
  <artifactId>spring-boot-starter-parent</artifactId>
  <version>2.2.6.RELEASE</version>
  <relativePath />
 </parent>
 <properties>
  <project.build.sourceEncoding>UTF-8</project.build.sourceEncoding>
  <project.reporting.outputEncoding>UTF-8</project.reporting.outputEncoding>
  <java.version>1.8</java.version>
 </properties>
 <dependencies>
  <dependency>
   <groupId>org.springframework.boot</groupId>
   <artifactId>spring-boot-starter-web</artifactId>
  </dependency>
  <dependency>
   <groupId>org.junit.jupiter</groupId>
   <artifactId>junit-jupiter-api</artifactId>

  </dependency>
 </dependencies>
 <build>
  <plugins>
   <plugin>
    <groupId>org.springframework.boot</groupId>
    <artifactId>spring-boot-maven-plugin</artifactId>
    <configuration>
     <addResources>true</addResources>
    </configuration>
    <executions>
     <execution>
      <goals>
       <goal>repackage</goal>
      </goals>
     </execution>
    </executions>
   </plugin>
  </plugins>
 </build>
</project>
Application Class
@ComponentScan({"com.bootng", "com.bootng.service"})
@SpringBootApplication
public class RestApplication {
  private static final Logger log = LoggerFactory.getLogger(RestApplication.class);
  public static void main(String args[]) {
    log.info("about to call RestApplication.run()");
    application.run(args);
    log.info("completed executing RestApplication.run()");
  }
}
EmailController
package com.bootng;

@Controller
public class EmailController {
  @Autowired
  public MailSenderProperties mailSender;
  @Autowired
  private ContactProperties contact;
  @Autowired
  private AddressProperties address;
  @Autowired
  private ApplicationContext applicationContext;
  @Value("${appserver.version}")
  private String paymentServerVer;
  @RequestMapping(value = {"/details"}, method = RequestMethod.GET,
      produces = MediaType.APPLICATION_JSON_VALUE)
  public @ResponseBody ResponseEntity <String> paymentInfo() {
    
    //Get the Bean with name PaymentProp
    HashMap<String, String> paymentProp = (HashMap<String, String>) applicationContext.getBean("PaymentProp");
    
    //Get the payment Server version from application.properties file
    String paymentInfo ="\nPayment Server Version:= " +  paymentProp.toString();
    
    String smtpInfo = "\n Mail Server SMTP Host: " + mailSender.getSmtpHost() + " SMTP Port:"
        + mailSender.getSmtpPort();
    
    String info = "\nContactInfo From=" + contact.getFrom() + " Email=" + contact.getFromEmail();
    String addressInfo = "\n AddressInfo Street=" + address.getStreet() + 
                         " City=" + address.getCity() +
                         " State=" + address.getState() +
                         " Zip=" + address.getZip();
    String result = paymentInfo + smtpInfo + info + addressInfo;
    return new ResponseEntity<String>(result, HttpStatus.OK);
  }
  
  @RequestMapping(value = {"/smtp"}, method = RequestMethod.GET,
      produces = MediaType.APPLICATION_JSON_VALUE)
  public @ResponseBody ResponseEntity<String> sendEmail() {

    String result = "<br>Mail Server SMTP Host: " + mailSender.getSmtpHost() + " SMTP Port:"
        + mailSender.getSmtpPort();

    return new ResponseEntity<String>("email sent" + result, HttpStatus.OK);
  }
  
  @RequestMapping(value = {"/address"}, method = RequestMethod.GET,
      produces = MediaType.APPLICATION_JSON_VALUE)
  public @ResponseBody ResponseEntity <String> getAddress() {
  
    String info = "From=" + contact.getFrom() + " Email=" + contact.getFromEmail();
    String addressInfo = " Street=" + address.getStreet() + 
                         " City=" + address.getCity() +
                         " State=" + address.getState() +
                         " Zip=" + address.getZip();
   
    return new ResponseEntity<String>(info + addressInfo, HttpStatus.OK);
  }
}
PaymentProperties
@Configuration
public class PaymentProperties {
  @Profile("dev")
  @Bean(name="PaymentProp")
  public HashMap<String, String> getPaymentServerDev() {
      HashMap<String, String> paymentMethod = new HashMap<>();
      paymentMethod.put("Currency", "USD");
      paymentMethod.put("ChargePercentage", "1");
      paymentMethod.put("Gateway", "BOA");
      return paymentMethod;
    }
  @Profile("prod")
  @Bean(name="PaymentProp")
  public HashMap<String, String> getPaymentServerProd() {
      HashMap<String, String> paymentMethod = new HashMap<>();
      paymentMethod.put("Currency", "Pound");
      paymentMethod.put("ChargePercentage", "4");
      paymentMethod.put("Gateway", "BankOfEngland");
      return paymentMethod;
    }
}
MailSenderProperties
@Component
@PropertySource("classpath:application-${spring.profiles.active}.properties")
public class MailSenderProperties {
  @Value("${mail.smtp.host}")
  private String smtpHost;

  @Value("${mail.smtp.port}")
  private Integer smtpPort;
  public String getSmtpHost() {
    return smtpHost;
  }
  public void setSmtpHost(String smtpHost) {
    this.smtpHost = smtpHost;
  }
  public Integer getSmtpPort() {
    return smtpPort;
  }
  public void setSmtpPort(Integer smtpPort) {
    this.smtpPort = smtpPort;
  }
}
ContactProperties
@Component
@ConfigurationProperties(prefix = "contact")
@PropertySource("classpath:office-address.properties")
@Validated
public class ContactProperties {
  @NotNull
  private String from;
  @Email
  private String fromEmail;
  @Value("${contact.fromTwitter}")
  private String twitterHandle;

  public String getFrom() {
    return from;
  }
  public void setFrom(String from) {
    this.from = from;
  }
  public String getFromEmail() {
    return fromEmail;
  }
  public void setFromEmail(String fromEmail) {
    this.fromEmail = fromEmail;
  }
  public String getTwitterHandle() {
    return twitterHandle;
  }
  public void setTwitterHandle(String twitterHandle) {
    this.twitterHandle = twitterHandle;
  }
}
AddressProperties
@Component
@PropertySource("classpath:office-address.properties")
@Validated
public class AddressProperties {
  @Value("${address.street}")
  private String street;
  @Value("${address.city}")
  private String city;
  @Value("${address.state}")
  private String state;
  @NotNull
  @Value("${address.zip}")
  private String zip;
  public String getStreet() {
    return street;
  }
  public void setStreet(String street) {
    this.street = street;
  }
  public String getCity() {
    return city;
  }
  public void setCity(String city) {
    this.city = city;
  }
  public String getState() {
    return state;
  }
  public void setState(String state) {
    this.state = state;
  }
  public String getZip() {
    return zip;
  }
  public void setZip(String zip) {
    this.zip = zip;
  }
}
application-dev.properties
logging.level.root=info
mail.smtp.host=mail.dev.com
mail.smtp.port=7777  
mail.smtp.user=test_dev 
application-prod.properties
logging.level.root=info
mail.smtp.host=mail.prod.com
mail.smtp.port=8888  
mail.smtp.user=prod_user
Run with profile prod
Run the application with prod profile set to active and then when the application is started, go to http://localhost:8080/details
mvn spring-boot:run -Dspring-boot.run.profiles=prod
Browser Output
Payment Server Version:= {Gateway=BankOfEngland, Currency=Pound, ChargePercentage=4} Mail Server SMTP Host: mail.prod.com SMTP Port:8888 ContactInfo From=admin Email=admin@bootng.com AddressInfo Street=1901 Palo Alto Avenue City=Palo Alto State=California Zip=950441
Run with profile dev
Stop the running application. And then restart with profile = dev
mvn spring-boot:run -Dspring-boot.run.profiles=dev
Browser Output
Payment Server Version:= {Gateway=BOA, Currency=USD, ChargePercentage=1} Mail Server SMTP Host: mail.dev.com SMTP Port:7777 ContactInfo From=admin Email=admin@bootng.com AddressInfo Street=1901 Palo Alto Avenue City=Palo Alto State=California Zip=950441
Download Source code
git clone git@github.com:bootng/spring-boot-references.git cd sping-boot-profiles mvn clean install mvn spring-boot:run -Dspring-boot.run.profiles=dev

Conclusion

This article shows different ways we can use Profiles in Application. We can see different values in the Controller output based on the profile. We can have multiple profiles active, but this article deals with only setting one profile at a time. Can you guess what will happen with this application and multiple profiles set active?
Spring Boot Profile Examples

This article show example of a Spring Boot Profile and how to use it. Spring Boot application can define multiple Profiles, and at a time we can have more than one Profile active. Activating a certain profile can let the Application use the profile-specific property values or profile-specific Beans. To use different values based on different Profiles, either we can use profile-specific properties files. Or we can also define beans under different Profiles.

Profile specific beans

In Spring Boot we can have Beans which are populated with different values based on the profile that is active. The following example shows a Configuration class PaymentProperties which contains a Bean PaymentProp defined under two profiles. For profile "dev" we are setting currency as USD but for profile "prod" we are setting currency as Pound.
@Profile at the @Bean
The following example shows how to use @Profile annotation at the method level. We have defined two methods(same PaymentProp Beans, different implementations under different Profile) inside the PaymentProperties class. Both methods are annotated with different Profiles. Essentially we have defined profile-specific beans.
@Configuration
public class PaymentProperties {

  @Profile("dev")
  @Bean(name="PaymentProp")
  public HashMap getPaymentServerDev() {
      HashMap paymentMethod = new HashMap<>();
      paymentMethod.put("Currency", "USD");
      paymentMethod.put("ChargePercentage", "1");
      paymentMethod.put("Gateway", "BOA");
      return paymentMethod;
   }
  
  
  @Profile("prod")
  @Bean(name="PaymentProp")
  public HashMap getPaymentServerProd() {
      HashMap paymentMethod = new HashMap<>();
      paymentMethod.put("Currency", "Pound");
      paymentMethod.put("ChargePercentage", "4");
      paymentMethod.put("Gateway", "BankOfEngland");
      return paymentMethod;
  }
  
}
Now When we load the bean, based on which profile is active, Spring Boot will load the corresponding Bean definition.

@Profile with @PropertySource

In this example, we have only one Class defined as MailSenderProperties. Based on the active profile spring boot will populate this class with values read from respective property files.
MailSenderProperties
The following class demonstrates how to use Profile to read profile based configuration files. In this case the MailSenderProperties class with be populated with values from the respective properties file.
@Component
@PropertySource("classpath:application-${spring.profiles.active}.properties")
public class MailSenderProperties {

  @Value("${mail.smtp.host}")
  private String smtpHost;

  @Value("${mail.smtp.port}")
  private Integer smtpPort;

  public String getSmtpHost() {
    return smtpHost;
  }

  public void setSmtpHost(String smtpHost) {
    this.smtpHost = smtpHost;
  }

  public Integer getSmtpPort() {
    return smtpPort;
  }

  public void setSmtpPort(Integer smtpPort) {
    this.smtpPort = smtpPort;
  }
}
Important Points
With Profile specific beans we have to make sure that the beans are available under the respective profiles, before using it. We can have multiple profiles active at a time so we can have multiple beans also populated. @Bean name is important as that is the name by which we can access the beans defined.

Further Reading


What is Spring Boot Profiles

Generally software applications, we need to be able to run it under different environments or under different setups. For example, say our application sends emails. For sending emails we need to configure SMTP servers with correct server URL, user, password etc. While developing we will generally have different SMTP servers credentials then the Production servers. Let's assume we have two different kinds of environments, dev- Development and prod-Production. So we would like to run the same code in dev and prod environments but with different configurations for email. Similarly we might have similar requirements for database, logs, security, etc, where we want to have different services/configurations plugged while in developing vs in productions. Spring Profiles helps to segregate our application configurations and make them available only in certain environments. 
In this article, we will dive into a situation where we would like to use different configurations in different environments. To achieve this high level we need two things,
1) Way to provide different configurations under different environments
2) Way to use environment-specific values in our app.
In the following example, we have two profiles and two property files. We have a java class MailSenderProperties which encapsulates the email configuration. Spring Boot will populate MailSenderProperties based on the profile that is active.

Profile and Properties files

Property file naming scheme
The property file is generally named by application HYPHEN PROFILENAME HYPHEN.properties.
application-{_profile_}.properties
We have two profiles (dev, prod) and two profile-specific property files. application-dev.properties application-prod.properties Now based on the profile we set active the property values would be read from the corresponding properties file.

Properties files

application-dev.properties
This is the property file for dev profile.
mail.smtp.host=mail.dev.com
mail.smtp.port=7777  
mail.smtp.user=test_dev 
application-prod.properties
This is the property file for prod profile.
mail.smtp.host=mail.prod.com
mail.smtp.port=8888  
mail.smtp.user=prod_user
application.properties
This is the common property file, which contains general configurations like logging level and also the active profile.
#Other configurations
spring.profiles.active=dev
logging.level.root=info

Mapping the Profile specific value to java class

MailSenderProperties
Java class to encapsulate the MailSender values, which are read from the application-PROFILE.properties file. We use the @PropertySource annotation and specify the respective property file that should be used by classpath:application-${spring.profiles.active}.properties
@Component
@PropertySource("classpath:application-${spring.profiles.active}.properties")
public class MailSenderProperties {

  @Value("${mail.smtp.host}")
  private String smtpHost;

  @Value("${mail.smtp.port}")
  private Integer smtpPort;

  public String getSmtpHost() {
    return smtpHost;
  }

  public void setSmtpHost(String smtpHost) {
    this.smtpHost = smtpHost;
  }

  public Integer getSmtpPort() {
    return smtpPort;
  }

  public void setSmtpPort(Integer smtpPort) {
    this.smtpPort = smtpPort;
  }
}

Setting Active Profile

We can set the active profile a number of ways. Some of the ways we need to change code to set the active profile. Here we will cover some fo the ways to set the active profile without changing code. 1) Set an active profile in the application.properties file ( dev is the active profile) spring.profiles.active=dev 2) set the active profile via an environment variable ( prod is the active profile) export spring_profiles_active=prod
Summary
  • Though using Spring Profile we can use a different set of properties under different circumstances
  • Spring profile can be set both programmatically and though environment variables
  • We can have more than one active profile settings at any time.
  • If we don't set any profile then Spring boot uses a profile called default profile.

Next Reading


Externalizing configuration properties

Spring Boot is developer-friendly and supports a number of features to increase productivity. One of them is externalizing configuration properties. Externalizing configuration properties means that all the configuration values are not hardcoded in the application and hence we can change the values as needed while deploying the application. Spring Boot supports a number of different ways to externalize properties and read them in the application.
We can have properties defined in various locations( different property files ) and various sources (property files, command line, System Properties, etc.), spring boot uses a specific order to read the values from those sources, which also enables us to override values. For example, we may provide some default values to the application, then while running it we might want to override some values.
The following are some of the places from where the application can read property values. The list is in descending priority. For example, property values passed though command-line argument will override Java system properties or default properties.
Property value priority order (Descending priority)
  • Command-line arguments.
  • Java System properties.
  • OS level environment variables.
  • @PropertySource annotations classes.
  • Application properties outside of your packaged jar.
  • Application properties packaged inside your jar.
  • Default properties.

Accessing properties values

Spring Boot provides multiple ways to access property values. The following are some of the ways. We will be using the bellow property file (office-address.properties) to demonstrate some of the ways to access the values defined in it.
office-address.properties
Property file which contains properties names and values. We will read this property to java classes by using @Value and @ConfigurationProperties
#Sample Property file
contact.from=admin
contact.fromEmail=admin@bootng.com
contact.fromPhone=Hello from bootng
contact.fromTwitter=@BootNGTweet

address.street=1901 Palo Alto Avenue
address.city=Palo Alto
address.state=California
address.zip=950441

Reading with @Value annotation

@Value
With @Value annotation, we can map a particular property to a java class field. Here we mapped different fields of the class AddressProperties to the properties in the office-address.properties by individual @Value annotations.
@Component
@PropertySource("classpath:office-address.properties")
@Validated
public class AddressProperties {
  @Value("${address.street}")
  private String street;

  @Value("${address.city}")
  private String city;

  @Value("${address.state}")
  private String state;

  @NotNull
  @Value("${address.zip}")
  private String zip;
}

Reading with @ConfigurationProperties annotation

@ConfigurationProperties
@Value is good when the properties are small in number. But say we want many properties to individual fields in the Java Class then we can use ConfigurationProperties. Spring will map the field name with the property name and will populate the value automatically. In the bellow example the filename twitterHandle does not match with the property fromTwitter. So with @ConfigurationProperties Spring boot will not be able to match the field with corresponding property and hence it would be null. To fix the issue we can use @Value("${contact.fromTwitter}") for the twitter field to populate it with @Value annotation.
@Component
@ConfigurationProperties(prefix = "contact")
@PropertySource("classpath:office-address.properties")
public class ContactProperties {

  private String from;

  private String fromEmail;

  @Value("${contact.fromTwitter}")
  private String twitterHandle;

  public String getFrom() {
    return from;
  }

}

Validating properties

@Validated Annotation
@Validated Annotation can be used to validate the field values. Spring Boot supports many validation rules, like NotNull, Email, NotEmpty, etc. Similar to the above class but now we have decorated the class with @Validated annotation and marked some of the fields with @NotNull and @Email validations. Doing so, if the values for these fields do not comfort to the validation rules defined, Spring Boot will throw expectation.
@Component
@ConfigurationProperties(prefix = "contact")
@PropertySource("classpath:office-address.properties")
@Validated
public class ContactProperties {

  @NotNull
  private String from;

  @Email
  private String fromEmail;

  @Value("${contact.fromTwitter}")
  private String twitterHandle;

  public String getFrom() {
    return from;
  }
}
Summary
  • We can use @Value annotation to map individual properties from the property file.
  • We can use @ConfigurationProperties to map all the fields of a class with respective properties from the property file.
  • With @ConfigurationProperties the field name in the class and property name should match.
  • With @ConfigurationProperties the prefix if provided is used to filter properties with matching name.
  • We can use both @Value and @ConfigurationProperties in the same class.
  • We can also validate the field values along with populating using @Validated annotation.

Introduction

This article show how to write a very simple Hello World Application in Spring. This application can be used as starting point for other applications.
We will go though the main components of the application, also code for the whole project is provided to download and play with it.

Technologies used

  • Java 11
  • Spring Boot 2.2.6.RELEASE
  • Maven 3.5.0
  • Eclipse IDE
This is a very simple Spring boot application with just one controller. The intention of the Application is to build a web app that when accessed will return a String message. This project is intended to help understand how to build a very simple Spring Application. So we are not touching other concepts like configuration, Profiles, etc.

Project Structure


Project code reference

The following paragraphs show important files for this sample project. Like the pom.xml file, HelloApplication.java (Spring Boot Application class) and the Controller class which is responsible for serving the request (HelloController.java)
pom.xml
<?xml version="1.0" encoding="UTF-8"?>
<project xmlns="http://maven.apache.org/POM/4.0.0"
 xmlns:xsi="http://www.w3.org/2001/XMLSchema-instance"
 xsi:schemaLocation="http://maven.apache.org/POM/4.0.0 http://maven.apache.org/xsd/maven-4.0.0.xsd">
 <modelVersion>4.0.0</modelVersion>
 <artifactId>bootng-springboot-hello</artifactId>
 <version>1.0.0</version>
 <packaging>war</packaging>
 <name>Spring Boot Hello</name>
 <description>Spring Boot Hello Simple Application</description>
 <parent>
  <groupId>org.springframework.boot</groupId>
  <artifactId>spring-boot-starter-parent</artifactId>
  <version>2.2.6.RELEASE</version>
  <relativePath />
 </parent>
 <properties>
  <project.build.sourceEncoding>UTF-8</project.build.sourceEncoding>
  <project.reporting.outputEncoding>UTF-8</project.reporting.outputEncoding>
  <java.version>1.8</java.version>
 </properties>
 <dependencies>
  <dependency>
   <groupId>org.springframework.boot</groupId>
   <artifactId>spring-boot-starter-web</artifactId>
  </dependency>
 </dependencies>
 <build>
  <plugins>
   <plugin>
    <groupId>org.springframework.boot</groupId>
    <artifactId>spring-boot-maven-plugin</artifactId>
    <configuration>
     <addResources>true</addResources>
    </configuration>
    <executions>
     <execution>
      <goals>
       <goal>repackage</goal>
      </goals>
     </execution>
    </executions>
   </plugin>
  </plugins>
 </build>
</project>
Application Class
Spring Boot entry class that would be loaded and executed once the application boots up. It does not do much except that it has the annotation @SpringBootApplication to tell the spring boot framework that this is the entry point class. Also, it has @ComponentScan, so that Spring boot framework can scan and load any components from package com.bootng.
package com.bootng;

import org.springframework.boot.SpringApplication;
import org.springframework.boot.autoconfigure.SpringBootApplication;
import org.springframework.context.annotation.ComponentScan;
import org.slf4j.Logger;
import org.slf4j.LoggerFactory;

@ComponentScan({"com.bootng"})
@SpringBootApplication
public class HelloApplication {
  private static final Logger log = LoggerFactory.getLogger(HelloApplication.class);
  public static void main(String args[]) {
    log.info("about to call HelloApplication.run()");
    SpringApplication.run(HelloApplication.class, args);
    log.info("completed executing HelloApplication.run()");
  }
}
HelloController
Our only Controller class that is mapped to the path /hello and return a String as a response.
package com.bootng;
import org.springframework.stereotype.Controller;
import org.springframework.web.bind.annotation.RequestMapping;
import org.springframework.web.bind.annotation.ResponseBody;

@Controller
public class HelloController {
  @RequestMapping("/hello")
  public  @ResponseBody String hello() {
    return "Hello Spring Boot!";
  }
}

Run hello spring boot app

Build and Run Application
run the following command in the console to build the application and then run the application.
mvn clean install
mvn spring-boot:run
Console (Portion of the terminal logs)
INFO main c.b.HelloApplication:651 - No active profile set, falling back to default profiles: default 
INFO main o.s.b.w.e.t.TomcatWebServer:92 - Tomcat initialized with port(s): 8080 (HTTP)
INFO main o.a.c.h.Http11NioProtocol:173 - Initializing ProtocolHandler ["http-nio-8080"]
INFO main o.a.c.c.StandardService:173 - Starting service [Tomcat]
INFO main o.a.c.c.StandardEngine:173 - Starting Servlet engine: [Apache Tomcat/9.0.33]
INFO main o.s.b.w.e.t.TomcatWebServer:204 - Tomcat started on port(s): 8080 (http) with context path ''
Started HelloApplication in 1.384 seconds (JVM running for 1.716)
INFO main c.b.HelloApplication:18 - completed executing HelloApplication.run()
Access the application by
typing in the browser.
 http://localhost:8080/hello
We should be able to see the page returning the message from the controller.
Download source code
  • git clone https://github.com/bootng/spring-boot-references
  • cd bootng-springboot-hello
  • mvn install
  • mvn spring-boot:run

    Summary

    • This article shows how to build a sample web application from scratch.
    • This is a Maven-based project, similarly, we can have a Gradle based project also.
    • For the mvn install step, we need to be connected to the internet.
    • This is a simple web app that has only one request path mapped.
    • If we try with different paths then this App will show an error page.

    Introducing Spring Boot Initializer

    Spring Boot Initializer is a web app that helps in bootstrapping spring boot projects. Though the Spring Boot Initializer we can quickly provide dependencies, choose a Build tool like Maven, Gradle, etc, and generate the codes along with configurations. The following image shows spring boot Initializer web app.

    Initializer Web App
    Spring Boot Initializer Web App

    How to generate code

    To generate the code please follow the following steps
    • Go to https://start.spring.io/
    • Select project build tools (Maven, Gradle).
    • Select the language (Java, Kotlin, Groovy).
    • Select Spring Boot Version
    • Provide the meta-information like the artifact name, descriptions, etc.
    • Select Java version.
    • Select Packaging.
    • And also select the dependencies based on the need for the project.
    We can always add more dependencies, change the java version, etc. from the generated project code.
    This will allow the web app to create a sample project with sample codes and dependencies which will be downloaded to your computer. 

    Sample generated project.

    The following image shows a code structure for a sample web project generated.


    Demo of code generation.

    Following video shows a demo of code generation using the web app.

    References

    Summary

    • Spring Boot initializr web app can be used to bootstrap project.
    • The downloaded source code contains all dependencies and sample classes.
    • We can also start by cloning or forking an existing git repository.

    Spring Boot

    Spring Boot is an open-source framework to create Applications with minimum configurations. Spring boot provides a range of non-functional features that are common to applications like embedded servers, health checks, externalized configuration, CLI, etc. With Spring Boot, we can focus more on actual application logic and less on infrastructure. Some of the important features and concepts related to Spring Boot are listed below, which helps in getting started with Spring Boot.

    Entry Point of Application

    The entry point for any Spring Application is a class decorated with @SpringBootApplication annotation. This class contains the main method which will be invoked when the application boots.

    Component Scan

    Spring Boot uses a lot of annotation to increase developer productivity. For Applications to discover and initialize other components, Spring Boot uses @ComponentScan annotation. We can specify other Classes or packages that need to be scanned and initialized.

    Configuration

    Spring boot supports deferent ways of reading application configurations. We can provide configurations in YAML files or properties files or Java POJO Classes.

    Profiles

    Spring Boot supports Spring Profiles, which is a kind of different set of configuration values for different environments. For instance, we can have different database credentials for Production vs Test environments. Here we can put the database credentials values different under different Profiles.

    Build Tools

    Spring Boot supports different Build environments and technologies. For instance, we can use a maven to configure the build infrastructure, or we can also use Gradle, etc.

    Spring Boot Starters

    Spring boot can be used to develop a range of applications along with using different third party libraries. Spring boot starters provide pre-bundled dependencies for a particular type of application. In the Spring Boot Framework, all the starters follow a similar naming pattern: spring-boot-starter-*, where * denotes a particular type of application. For example if we want to develop an application based on Elastic Search we can use the starter spring-boot-starter-data-elasticsearch to bootstrap the application.

    Java Sorting with List and Array

    Array and List are some of the basic and very useful data structures. We often need to sort the data stored in Array and List. In this article, we examine some of the most common ways of sorting. Java provides Collections.sort class to sort Collections like List, Set, etc. Similarly, java also provides Arrays.sort() to sort Arrays. Both Collections.sort() and Arrays.sort() also takes Comparable instance which can be used to sort the data.

    List Sorting

    The following example shows different ways of sorting the Java List. We will be using Collections.sort() to sort the list. Collections class is part of the java.util package, and the sort method accepts a Comparator also. If we pass Comparator then the Comparator will be used to sort the objects in the collection. If Comparator is not passed then the natural ordering of the objects will be used to sort. Comparator.sort() takes a list of any objects provided that object implements a Comparable interface.
    Create List and Add Data
    Following code creates a list and adds data to it.
    List nameList = new ArrayList();
    nameList.add("Brazil");
    nameList.add("Canada");
    nameList.add("Japan");
    nameList.add("China");
    nameList.add("Australia");
    nameList.add("Russia");
    nameList.add("Nepal");
    nameList.add("Italy");
    nameList.add("Germany");
    Collections.sort
    The following code will sort the list using the natural ordering of the items in the list. For the above array, it will print Australia, Brazil, Canada, China, Germany, Italy, Japan, Nepal, Russia,
    printMessage("Sort List ......");
    Collections.sort(nameList);
    nameList.forEach(a -> nicePrint(a));
    
    Collection.sort with reverseOrder()
    Like above now we are sorting using Collections.sort, but also passing reverseOrder() comparator. It will print Russia, Nepal, Japan, Italy, Germany, China, Canada, Brazil, Australia,
    printMessage("Sort List Reverse Order .......");
    Collections.sort(nameList, Collections.reverseOrder());
    nameList.forEach(a -> nicePrint(a));
    Collection.sort using a custom Comparator
    Following code, sorts using Collections.sort and passed custom Comparator implemented using Lambda. It will print Australia, Brazil, Canada, China, Germany, Italy, Japan, Nepal, Russia,
    printMessage("Sort List using custom Comparator");
    Collections.sort(nameList, (k1, k2) -> (k1.compareTo(k2)));
    nameList.forEach(a -> nicePrint(a));
    Sort Part of the List
    We can also sort part of the list. For that, we can pass subList() of the actual list to the Collections.sort() method. The following code will print Brazil, Canada, Japan, China, Australia, Russia, Nepal, Italy, Germany. See the first 3 country names are sorted.
    Collections.sort(nameList.subList(0, 3));
    nameList.forEach(a -> nicePrint(a));

    Array Sorting

    The following example shows different ways of sorting the Java Array. We will be using Arrays.sort() to sort the array.
    Sort Array
    Sort the data array using Arrays.sort(). It will print the following It will print Australia, Brazil, Canada, China, Germany, Italy, Japan, Nepal, Russia.
    Arrays.sort(data);
    Sort Array in reverse order
    Sort in reverse order, bypassing reverseOrder() to the Arrays.sort() method. It will print Russia, Nepal, Japan, Italy, Germany, China, Canada, Brazil, Australia,
    Arrays.sort(data, Collections.reverseOrder());
    Sort Array by using a custom comparator
    Following code sorts data using Arrays.sort and a custom Comparator by using lambda.
    Arrays.sort(data, (k1, k2) -> (k1.compareTo(k2)));
    Sorting part of Array
    We can sort part of an array also, the following example shows how to sort only the first 3 items in the Array.
    Arrays.sort(data, 0, 3);
    Sorting Array using parallel sort.
    We can also sort the data by using parallelSort().
    Arrays.parallelSort(data);
    Summary
    • Collections.sort() can be used to sort a list of objects.
    • Collections.sort() uses BinarySearch algorithm.
    • Arrays.sort() uses Mergesort or Timsort algorithms to sort the data.
    • Collections.sort() and Arrays.sort() throws NullPointerException if data is null.
    • The object that we are sorting should implement java.langComparable interface.

    Stack data structure

    Stack is a LIFO data structure used to store a collection of objects. Individual items can be added and stored in a stack using a push operation. Objects can be retrieved using a pop operation, which removes an item from the top of the stack. Since it is LIFO(Last in First Out) Item added last is the first to come out of the stack. Java comes with multiple options when choosing a Stack. The first one is the old java.util.Stack and the second one is interface Deque and its implementations like ArrayDeque, Linkedlist etc.
    Common operations on stack data structure are as follows,
    • push : Add data to top of the stack.
    • peek : Look what is on the top of the stack without removing it.
    • pop: Remove the object at the top of this stack.
    • size.: Size of the stack, which is number of items on the stack.

    Different options for Stack

    Java provides mainly 
    java.util.Stack and java.util. Deque Implementation classes (ArrayDeque, Linkedlist) as stack data structures . Choosing the implementation of choice depends on the use case we are dealing with. Following sections shows using java.util.Stack and java.util.ArrayDeque as Stack data structure.

    java.util.Stack as stack data structure

    java.util.Stack class extends java.util.Vector and represents a LIFO data structure. It is one of the oldest class that ships with Java 1 onwards. 
    Following example show how to initialize a Stack() object, some common operations on stack, like push items to the stack, check size of the stack, peek the top of the stack and iterate over the stack etc.
    Stack stack = new Stack();
    
    //push items to stack
    stack.push("Transformers (2007)");
    stack.push("Transformers: Revenge of the Fallen (2009)");
    stack.push("Transformers: Dark of the Moon (2011)");
    stack.push("Transformers: Age of Extinction (2014)"); 
    stack.push("Transformers: The Last Knight (2017)"); 
    stack.push("Bumblebee (2018)"); 
    
    //Size of the stack
    System.out.println("Size of the stack = " + stack.size());
    
    //Peek the top of the stack
    System.out.println("Peek top of the stack = " + stack.peek());
    //Pop the top of the stack
    System.out.println("Peek top of the stack = " + stack.pop()); 
    
    //Print entries of the Stack
    System.out.println("Entries in the Stack");
    stack.forEach(a-> System.out.println(a));
    
    //Print entries of the Stack Using Iterator
    System.out.println("Entries in the Stack Using Iterator");
    Iterator it = stack.iterator();
    while(it.hasNext()) {
      String item = it.next();
      System.out.println(item);
    }
    java.util.Deque as Stack data structure
    java.util.Deque is also known as double ended queue is an interface that extends java.util.Queue.
    The Deque interface adds some interesting methods like pop() addFirst(), addLast() etc, which allows us to add and remove the data from both end of the queue,  deque implementations can be used both as a Stack (LIFO) or Queue (FIFO) data structure. 

    Following diagram shows the Object hierarchy for Deque.


    Java provides two implementation of java.util.Deque, ArrayDeque and LinkedList.
    Following example shows how to use Deque as Stack. Here we are using ArrayDeque as an Deque instance. And we are doing exactly the same things that we did with Stack in the above example.
    Deque stack2 = new ArrayDeque();
    
    //push items to stack
    stack2.push("Transformers (2007)");
    stack2.push("Transformers: Revenge of the Fallen (2009)");
    stack2.push("Transformers: Dark of the Moon (2011)");
    stack2.push("Transformers: Age of Extinction (2014)"); 
    stack2.push("Transformers: The Last Knight (2017)"); 
    stack2.addFirst("Bumblebee (2018)");  // same as push()
    
    //Size of the stack
    System.out.println("Size of the stack = " + stack2.size());
    
    //Peek the top of the stack
    //Prints Bumblebee (2018)
    System.out.println("Peek top of the stack = " + stack2.peekFirst()); 
    
    //Pop the top of the stack
    //Prints Bumblebee (2018)
    System.out.println("Peek top of the stack = " + stack2.pop()); 
    //Print entries of the Stack System.out.println("Entries in the Stack"); stack2.forEach(a-> System.out.println(a)); //Print entries of the Stack Using Iterator System.out.println("Entries in the Stack Using Iterator"); Iterator it2 = stack2.iterator(); while(it2.hasNext()) { String item = it2.next(); System.out.println(item); }
    Summary
    • java.util.Stack is synchronized data structure.
    • java.util.Stack extends Vector internally.
    • Deque is an interface, and it has multiple implementations like ArrayDeque, LinkedList etc.
    • Deque is newer compared to java.util.Stack is more preferable as a Stack implementation.
    • Deque can be used both as a Stack or Queue data structure, depending on which methods we are using to add or remove item from the Deque. 

    References


    QUEUE IN JAVA

    Queue is FIFO(First in First Out) data structure, which means that element inserted first will be removed first. In Java Queue is an interface and it provides multiple implementation of Queue with different properties, which makes certain implementation better suited for certain scenarios. Queue interface extends the Collection Interface so it provides common collection methods like size(), isEmpty(), addAll(), clear() etc. This article covers some of the common examples of using Queue in java
    Most generally when we need a FIFO data structure we can use PriorityQueue, LinkedList, ArrayDeque classes. They can be classified as Queue and Deque.

    Queue

    The interface java.util.Queue is the Queue interface. PriorityQueue, LinkedList are the most common Queue implementations. When we need Queue we can use instance of any of the PriorityQueue, LinkedList classes.
    Queue Implementations
    • PriorityQueue
    • LinkedList
    PriorityQueue Example
    Create instance of PriorityQueue, add 5 items to it. Print the size, and peek the first item.
    Queue q1 = new PriorityQueue();
    
    //Add 5 items to q1
    q1.offer("a");
    q1.offer("b");
    q1.offer("c");
    q1.offer("d");
    q1.offer("e");
    
    System.out.println("Size of q1 = " + q1.size());
    System.out.println("First Element of q1 = " + q1.peek());
    Queue Iteration
    Iterate over a Queue and print its item.
    //iterate
    System.out.println("Iterating on Queue");
    Iterator it1 = q1.iterator();
    
    while (it1.hasNext()) {
      String item = it1.next();
      System.out.print(item + " ");
    }

    Deque

    java.util.Deque is the Deque interface. Deque is also known as double ended Queue. That means we can add and remove items at both ends of the queue. LinkedList and ArrayDeque implements DeQueue Interface(Double ended queue).
    Deque Implementations
    • LinkedList
    • ArrayDeque
    Deque Example
    Create two queue q2 and q3. Since we are creating instances of Deque, we can access both end of the contents. Like peekFirst(), peekLast() to peek the first and last element respectively.
    Deque q2 = new LinkedList();
    Deque q3 = new ArrayDeque();
    System.out.println("First Element of q2 = " + q2.peekFirst());
    System.out.println("Last  Element of q2 = " + q2.peekLast());

    Concurrent Queue Implementations

    The java.util.concurrent package contains BlockingQueue and its implemented classes. BlockingQueue is used in multi threaded application, when we want a thread to wait or blocked unless we have item in the thread.
    BlockingQueue implemented classes.
    • LinkedBlockingQueue — an optionally bounded FIFO blocking queue backed by linked nodes
    • ArrayBlockingQueue — a bounded FIFO blocking queue backed by an array
    • PriorityBlockingQueue — an unbounded blocking priority queue backed by a heap
    • DelayQueue — a time-based scheduling queue backed by a heap
    • SynchronousQueue — a simple rendezvous mechanism that uses the BlockingQueue interface
    Summary
    • PriorityQueue, LinkedList, ArrayDeque are suitable in most cases.
    • Deque can be used as a stack also.
    • LinkedList and ArrayDeque are most commonly Deque implementations.
    • PriorityQueue is most commonly used Queue implementation

    How to Sort HashMap in java

    This article covers some of the aspects of sorting Map in Java. Java Map comes in different flavours, like HashMap, TreeMap, LinkedHashMap etc. TreeMap for instance will sort the data based on the keys. We can also pass a custom Comparator to sort based on the keys as per the custom sort algorithm.
    We can have two requirements in terms of sorting, first one is sorting by Keys and second is Sorting by Values. Following examples demonstrates few approaches for sorting by key and sorting by value. Following examples uses Java Lambda and Stream api to sort Java HashMap instance.

    Sort by Value

    Map sort by value in revere order
    Following code snippet sorts the map based on value in reverse order and populates a new map reverseSortedMap from the data.
    //LinkedHashMap preserve the ordering of elements in which they are inserted
    Map reverseSortedMap =  new LinkedHashMap();
    //Use Comparator.reverseOrder() for reverse ordering
    map.entrySet()
        .stream()
        .sorted(Map.Entry.comparingByValue(Comparator.reverseOrder())) 
        .forEachOrdered(x -> reverseSortedMap.put(x.getKey(), x.getValue()));

    Sort By Key

    Map sort by key in revere order
    Following code snippet sorts the map based on the keys in reverse order.
    //LinkedHashMap preserve the ordering of elements in which they are inserted
    Map reverseSortedMapByKey =  new LinkedHashMap();;
    //Use Comparator.reverseOrder() for reverse ordering
    map.entrySet()
        .stream()
        .sorted(Map.Entry.comparingByKey(Comparator.reverseOrder())) 
        .forEachOrdered(x -> reverseSortedMapByKey.put(x.getKey(), x.getValue()));
     
    
    System.out.println("Sorted by Value Map : " + reverseSortedMapByKey);

    Full Example

    MapSortJava
    public class MapSortJava {
    
      public static void main(String[] args) {
    
        Map<Integer, String> map = new HashMap<Integer, String>();
        map.put(101, "Tokyo");
        map.put(3, "New York");
        map.put(2, "San Francisco");
        map.put(14, "Los Angels");
        map.put(5, "Austin");
    
        System.out.println("Unsorted Map : " + map);
        
       // LinkedHashMap preserve the ordering of elements in which they are inserted
        Map<Integer, String> reverseSortedMap = new LinkedHashMap<Integer, String>();;
        // Use Comparator.reverseOrder() for reverse ordering
        map.entrySet().stream().sorted(Map.Entry.comparingByValue(Comparator.reverseOrder()))
            .forEachOrdered(x -> reverseSortedMap.put(x.getKey(), x.getValue()));
        System.out.println("Sorted by Value Map : " + reverseSortedMap);
    
    
        // LinkedHashMap preserve the ordering of elements in which they are inserted
        Map<Integer, String> reverseSortedMapByKey = new LinkedHashMap<Integer, String>();;
        // Use Comparator.reverseOrder() for reverse ordering
        map.entrySet().stream().sorted(Map.Entry.comparingByKey(Comparator.reverseOrder()))
            .forEachOrdered(x -> reverseSortedMapByKey.put(x.getKey(), x.getValue()));
        System.out.println("Sorted by Value Map : " + reverseSortedMapByKey);
    
      }
    }
    Output
    Unsorted Map : 2 ==> San Francisco 3 ==> New York 101 ==> Tokyo 5 ==> Austin 14 ==> Los Angels Sorted by Value Map (Reverse) : 2 ==> San Francisco 3 ==> New York 101 ==> Tokyo 5 ==> Austin 14 ==> Los Angels Sorted by Value Map (Reverse) : 101 ==> Tokyo 14 ==> Los Angels 5 ==> Austin 3 ==> New York 2 ==> San Francisco
    Summary of steps
    • Get the entry set by calling the Map.entrySet().
    • Get the entry set stream by calling stream() method.
    • Use the Map.Entry.comparingByValue() or Map.Entry.comparingByKey().
    • Call the sorted method with a Comparator.
    • call the terminal operation forEachOrdered to store the each entries in the new Map.